WAC vMode Behind Entra App Proxy
Reach the new Windows Admin Center from anywhere, with Entra sign-in and MFA in front of it and no VPN
Table of Contents
Preface
Windows Admin Center Virtualization Mode (WAC vMode) is Microsoft’s new web console for managing Hyper-V clusters, currently in public preview. It’s a big step up from the Administration Mode WAC you’ve probably used before, and I’ll do more on it once it goes GA.
So you’ve got your shiny new Hyper-V cluster and WAC vMode all set up, then your friend with Azure Local comes over and says “but I can manage my cluster from anywhere, securely, without a VPN.” Well, guess what? You can too, and you probably already have everything you need.
This all started when I was sitting on an unnamed campus near Seattle and wanted to spin up a VM on one of my clusters, but they blocked EVERYTHING: UniFi Teleport, Tailscale, you name it. What don’t they block? Microsoft Entra. One of Entra ID’s best-kept secrets is Entra application proxy. It’s simple to set up, puts your Conditional Access policies in front of the app, supports high availability with more than one connector, and only needs Entra ID P1.
It mostly works out of the box. Two settings, one in Entra and one on the WAC gateway, are the difference between a working dashboard and an “Unauthorized Access (Expired)” page a few seconds after you sign in.
How it works
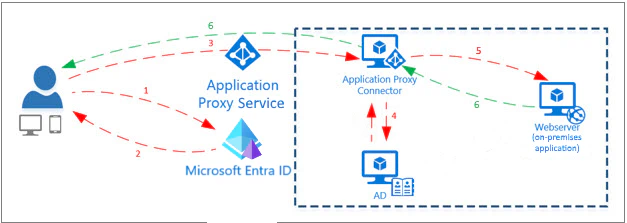
- The browser goes to the external URL, and the Application Proxy Service sends it to Microsoft Entra ID to sign in.
- Entra checks the sign-in against Conditional Access (MFA here) and hands back a token.
- The browser comes back to the Application Proxy Service with the token.
- (Only for Kerberos single sign-on, which this setup doesn’t use.) The connector gets a Kerberos ticket from AD for the user.
- The connector, which already holds an outbound connection to the service, forwards the request to the internal URL: the WAC gateway.
- The response goes back the same way.
The connector only makes outbound connections, so nothing on your network accepts inbound traffic.
What you need
- WAC vMode installed on a server. I used the public preview
2.8.2.8for this. - Microsoft Entra ID P1 or P2. It’s included in Microsoft 365 Business Premium, E3 and E5.
- A server for the private network connector that can reach the WAC gateway on 443, and reach the internet outbound on 443 and 80 (80 is for certificate revocation checks). If your egress is filtered, allow the URLs in Microsoft’s connector requirements.
That’s enough to publish WAC at https://wacv-yourtenant.msappproxy.net/.
Optional: your own domain name
To use wacv.yourdomain.com instead, you also need:
- A custom domain verified in Entra.
- A TLS certificate for that name, as a
.pfxwith its private key. Entra doesn’t issue or renew it for you. A certificate from your internal CA works, as long as the devices you connect from trust its root. - Access to your public DNS, to add one CNAME that points the name at Application proxy.
Install Windows Admin Center

This installer works perfectly fine on Windows Server Core.
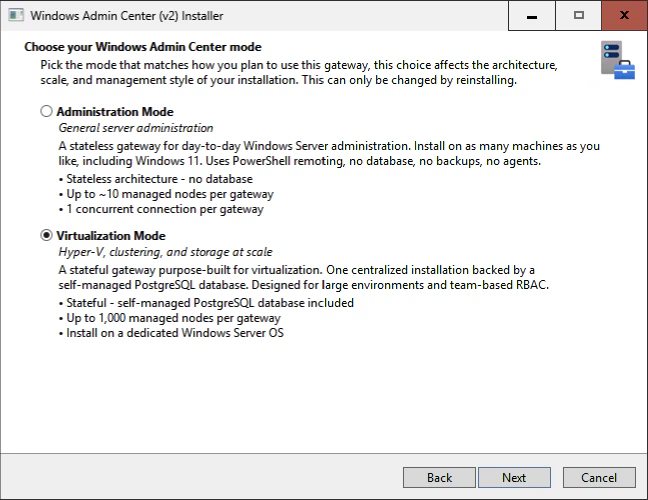
The new installer asks which mode you want. Pick Virtualization Mode.
When it asks for a TLS certificate, give it a certificate for the gateway’s internal name
(jkt-wacv-71.internal.net here). The connector talks to the gateway on that name. The public name gets its
own certificate in Entra later.
Install the private network connector
In the Entra admin center go to Application proxy, then Download connector service, and accept the terms. Copy the installer to the connector server.
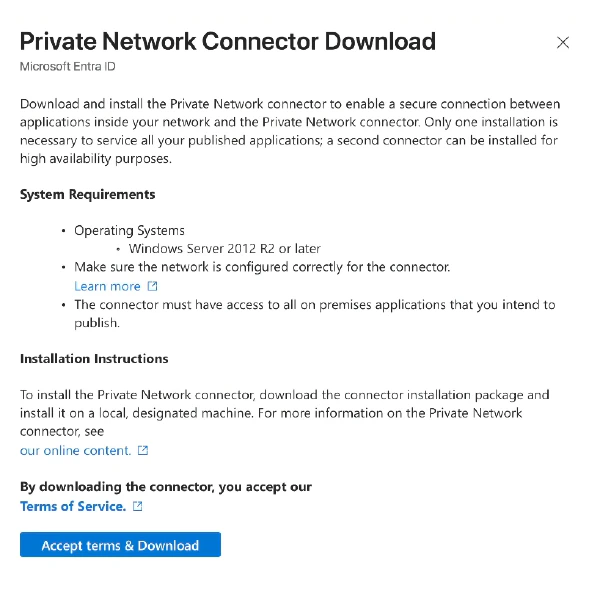
On a server with the desktop experience, run the installer, sign in with an account that’s an Application Administrator or Global Administrator when it asks, and you’re done.
Connector on Server Core
My connector server runs Server Core, and the installer failed near the end with:
User authentication failed. Make sure you enabled Application Proxy in the Azure Management Portal and try to register again.Application proxy was enabled and the prerequisites were fine. The real error is only in the MSI log in
%TEMP%:
System.DllNotFoundException: Unable to load DLL 'IEFRAME.dll': The specified module could not be found.The sign-in window needs the desktop experience, and Server Core doesn’t have it. The installer then rolls everything back. The fix is to install without registering, then register with a token.
Install the connector without the sign-in step:
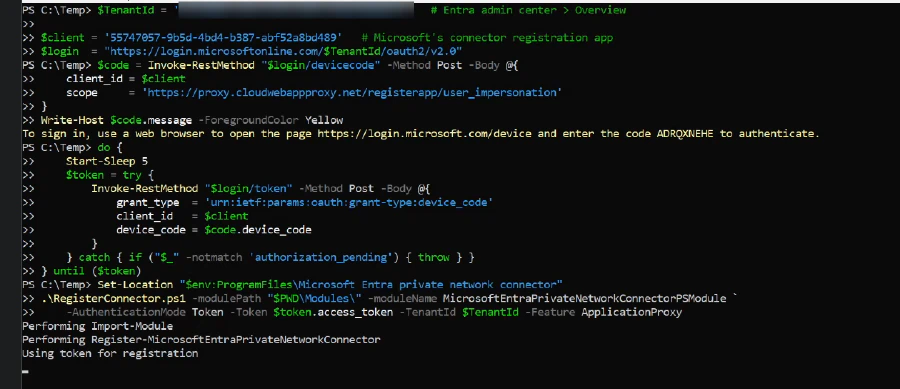
.\MicrosoftEntraPrivateNetworkConnectorInstaller.exe REGISTERCONNECTOR="false" /q.\MicrosoftEntraPrivateNetworkConnectorInstaller.exe REGISTERCONNECTOR="false" /qThen register it. This asks Entra for a device code, so you can sign in from any browser on any device, then hands the token to the connector’s own registration script. Put your tenant ID (from the Entra admin center Overview page) on the first line:
$TenantId = '<your-tenant-id>'   # Entra admin center > Overview

$client = '55747057-9b5d-4bd4-b387-abf52a8bd489'   # Microsoft's connector registration app
$login  = "https://login.microsoftonline.com/$TenantId/oauth2/v2.0"

# 1. Get a sign-in code, then sign in with it from any browser
$code = Invoke-RestMethod "$login/devicecode" -Method Post -Body @{
    client_id = $client
    scope     = 'https://proxy.cloudwebappproxy.net/registerapp/user_impersonation'
}
Write-Host $code.message -ForegroundColor Yellow

# 2. Wait for the sign-in to finish
do {
    Start-Sleep 5
    $token = try {
        Invoke-RestMethod "$login/token" -Method Post -Body @{
            grant_type  = 'urn:ietf:params:oauth:grant-type:device_code'
            client_id   = $client
            device_code = $code.device_code
        }
    } catch { if ("$_" -notmatch 'authorization_pending') { throw } }
} until ($token)

# 3. Register the connector
Set-Location "$env:ProgramFiles\Microsoft Entra private network connector"
.\RegisterConnector.ps1 -modulePath "$PWD\Modules\" -moduleName MicrosoftEntraPrivateNetworkConnectorPSModule `
    -AuthenticationMode Token -Token $token.access_token -TenantId $TenantId -Feature ApplicationProxy
$TenantId = '<your-tenant-id>' # Entra admin center > Overview
$client = '55747057-9b5d-4bd4-b387-abf52a8bd489' # Microsoft's connector registration app
$login = "https://login.microsoftonline.com/$TenantId/oauth2/v2.0"
# 1. Get a sign-in code, then sign in with it from any browser
$code = Invoke-RestMethod "$login/devicecode" -Method Post -Body @{
client_id = $client
scope = 'https://proxy.cloudwebappproxy.net/registerapp/user_impersonation'
}
Write-Host $code.message -ForegroundColor Yellow
# 2. Wait for the sign-in to finish
do {
Start-Sleep 5
$token = try {
Invoke-RestMethod "$login/token" -Method Post -Body @{
grant_type = 'urn:ietf:params:oauth:grant-type:device_code'
client_id = $client
device_code = $code.device_code
}
} catch { if ("$_" -notmatch 'authorization_pending') { throw } }
} until ($token)
# 3. Register the connector
Set-Location "$env:ProgramFiles\Microsoft Entra private network connector"
.\RegisterConnector.ps1 -modulePath "$PWD\Modules\" -moduleName MicrosoftEntraPrivateNetworkConnectorPSModule `
-AuthenticationMode Token -Token $token.access_token -TenantId $TenantId -Feature ApplicationProxyWhen it asks “Are you trying to sign in to…”, choose Continue.
Pass the token as a plain string. Microsoft’s docs show -Token as a SecureString, but in connector
1.5.5130.0 the parameter is a [String]. A SecureString arrives empty, and registration fails with “Make
sure you are an administrator of the AD directory”, even when you’re a Global Administrator.
Check the connector
Back in Application proxy, the connector should show as Active in the Default group.
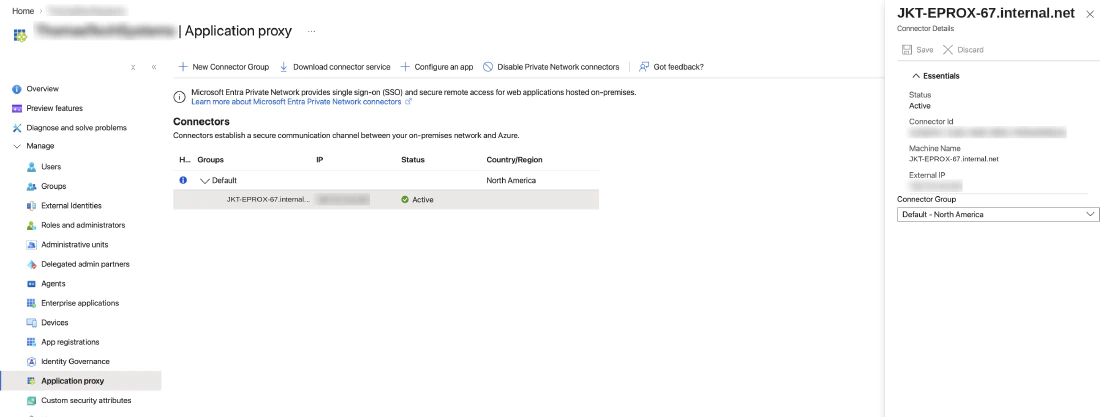
Microsoft recommends at least two connectors per group, so one can be patched or rebooted without taking the app down.
Publish the app
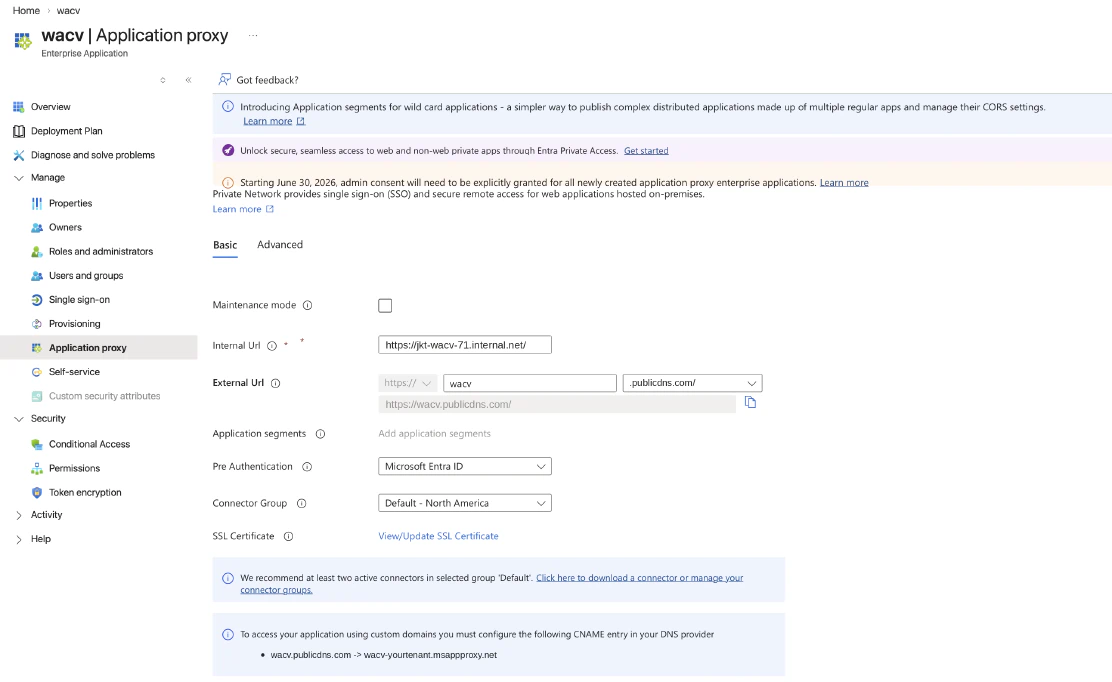
Create the app from Application proxy, then Configure an app (or Enterprise applications, then New application, then Add an on-premises application). Then, on its Application proxy page:
| Setting | Value |
|---|---|
| Internal Url | https://jkt-wacv-71.internal.net/ (the gateway’s internal name) |
| External Url | wacv, with your custom domain (or the msappproxy.net default) picked from the dropdown |
| Pre Authentication | Microsoft Entra ID |
| Connector Group | The group your connector is in |
Turn off header translation
On the Advanced tab, turn Translate URLs in headers off.
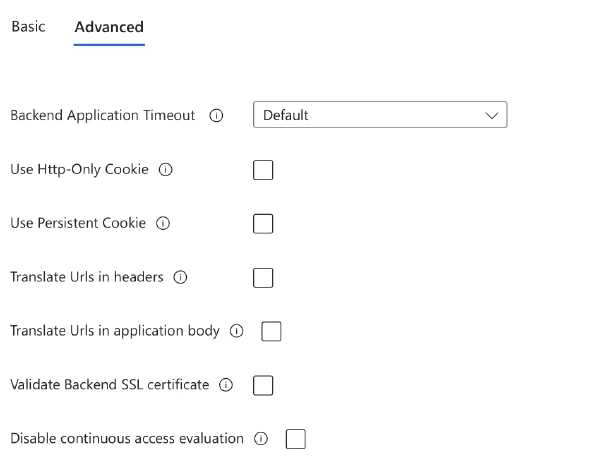
With it on, Application proxy rewrites the Host header to the internal name, so WAC sees
jkt-wacv-71.internal.net while the browser is on wacv.publicdns.com. Sign-in still works, which is
what makes this confusing, but WAC’s anti-forgery checks reject most of what happens after it.
Upload the certificate (custom domain only)
Back on the Basic tab, click Add SSL Certificate (it becomes View/Update SSL Certificate once
one is bound), pick the .pfx, enter its password and upload it.
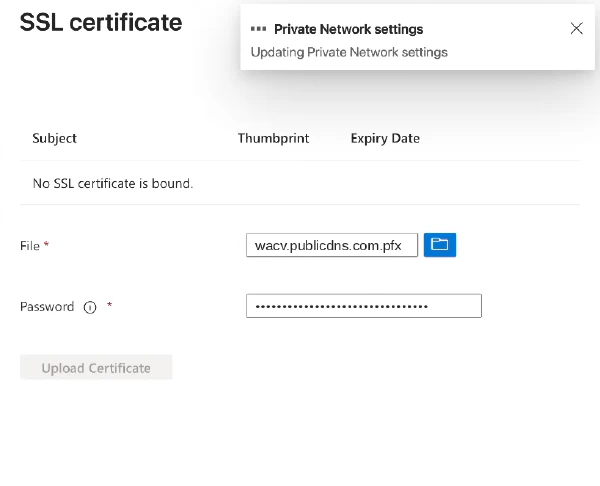
The portal doesn’t ask for the certificate when you save the URLs, so it’s easy to miss. Until it’s
uploaded, the custom domain serves Microsoft’s *.msappproxy.net certificate and every browser warns. Once
uploaded it took a few minutes before the new certificate was being served.
Add the DNS record (custom domain only)
The bottom of the page shows the CNAME to create, for example
wacv.publicdns.com -> wacv-<tenant>.msappproxy.net. Add it at your DNS provider.
Allow the external name on the WAC gateway
WAC only accepts WebSocket and cross-origin requests from origins it knows, and out of the box that list is
empty. Through the proxy, the browser’s origin is the external URL, so add it to appsettings.json on the
gateway and restart the service:
$file = 'C:\Program Files\WindowsAdminCenter\Service\appsettings.json'
$url  = 'https://wacv.publicdns.com'

Copy-Item $file "$file.bak"
$json = Get-Content $file -Raw
$json = $json.Replace('"CorsSites": [],', "`"CorsSites`": [ `"$url`" ],")
$json = $json.Replace('"WebSocketAllowedOrigins": []', "`"WebSocketAllowedOrigins`": [ `"$url`" ]")
[IO.File]::WriteAllText($file, $json)

Restart-Service WindowsAdminCenter
$file = 'C:\Program Files\WindowsAdminCenter\Service\appsettings.json'
$url = 'https://wacv.publicdns.com'
Copy-Item $file "$file.bak"
$json = Get-Content $file -Raw
$json = $json.Replace('"CorsSites": [],', "`"CorsSites`": [ `"$url`" ],")
$json = $json.Replace('"WebSocketAllowedOrigins": []', "`"WebSocketAllowedOrigins`": [ `"$url`" ]")
[IO.File]::WriteAllText($file, $json)
Restart-Service WindowsAdminCenterWithout this, the dashboard loads, then its live connections are refused and the page falls over to “Unauthorized Access (Expired)” (see Troubleshooting).
Re-check it after every WAC update or reinstall. The installer rewrites appsettings.json.
Lock it down
Assignment is required on the app, so only the users and groups on its Users and groups page can get past Entra. Keep that list short. This is the management plane for your clusters.
Conditional Access applies to the app like any other. My Require MFA policy covers all apps, so there’s
nothing app-specific to add.
Sign in
Browse to the external URL. You sign in to Entra first (with MFA), then to WAC itself. The proxy doesn’t pass your identity through to WAC, so it’s two sign-ins.
Troubleshooting
“Unauthorized Access (Expired)”
Error 403
Credentials were expired or Windows Admin Center was restarted. Navigate to Login Home and enter credentials again.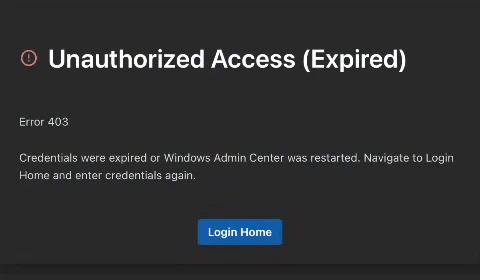
You get past Entra, sign in to WAC, the dashboard starts loading, and a few seconds later this appears. The
gateway’s event log (WindowsAdminCenter) shows the login succeeding, then 403s on
/api/Services/EnterpriseAggregator/AgentQuery/Socket and on the dashboard’s API calls. Check both fixes:
- Translate URLs in headers is off on the app’s Advanced tab.
- The external URL is in
CorsSitesandWebSocketAllowedOriginson the gateway, and theWindowsAdminCenterservice was restarted afterwards.
I needed both. With only the first, the regular API calls worked but the WebSockets were still refused.
Browser warns about the certificate
Either the certificate isn’t uploaded yet (the site serves *.msappproxy.net), it was uploaded a few
minutes ago and isn’t being served yet, or it comes from an internal CA your device doesn’t trust.