Mirco-S2D
Table of Contents
Preface
I know we all hate nothing more than a long story before the recipe, but this one has some real explaining to do. Lucky you, I have a table of contents and you can skip over my woes.
First, this is not what this project was supposed to be and if I could do it all over again, I wouldn’t. I chose the Minisforum MS-01 to make a 2-node S2D cluster due to the NVMe slots, dual 20g thunderbolt, and dual 10g SFP+. I was hoping to use the dual 20g thunderbolt ports for storage & live migration, and the 10g X710 ports for Management & Compute. I even picked up some QNAP cards so I could do 5x NVMe per node.
Unfortunately, I could not get the thunderbolt ports to work for SMB Multichannel or Network ATC, so using them for storage was off the table. They can however come in handy as a way to RDP from one node to the other when messing with network changes, so they’re only nearly useless. Next problem, it took me months to get the X710’s to behave. You really do need the latest firmware and drivers. Even with all of that, I can’t recommend the X710’s for any storage traffic.
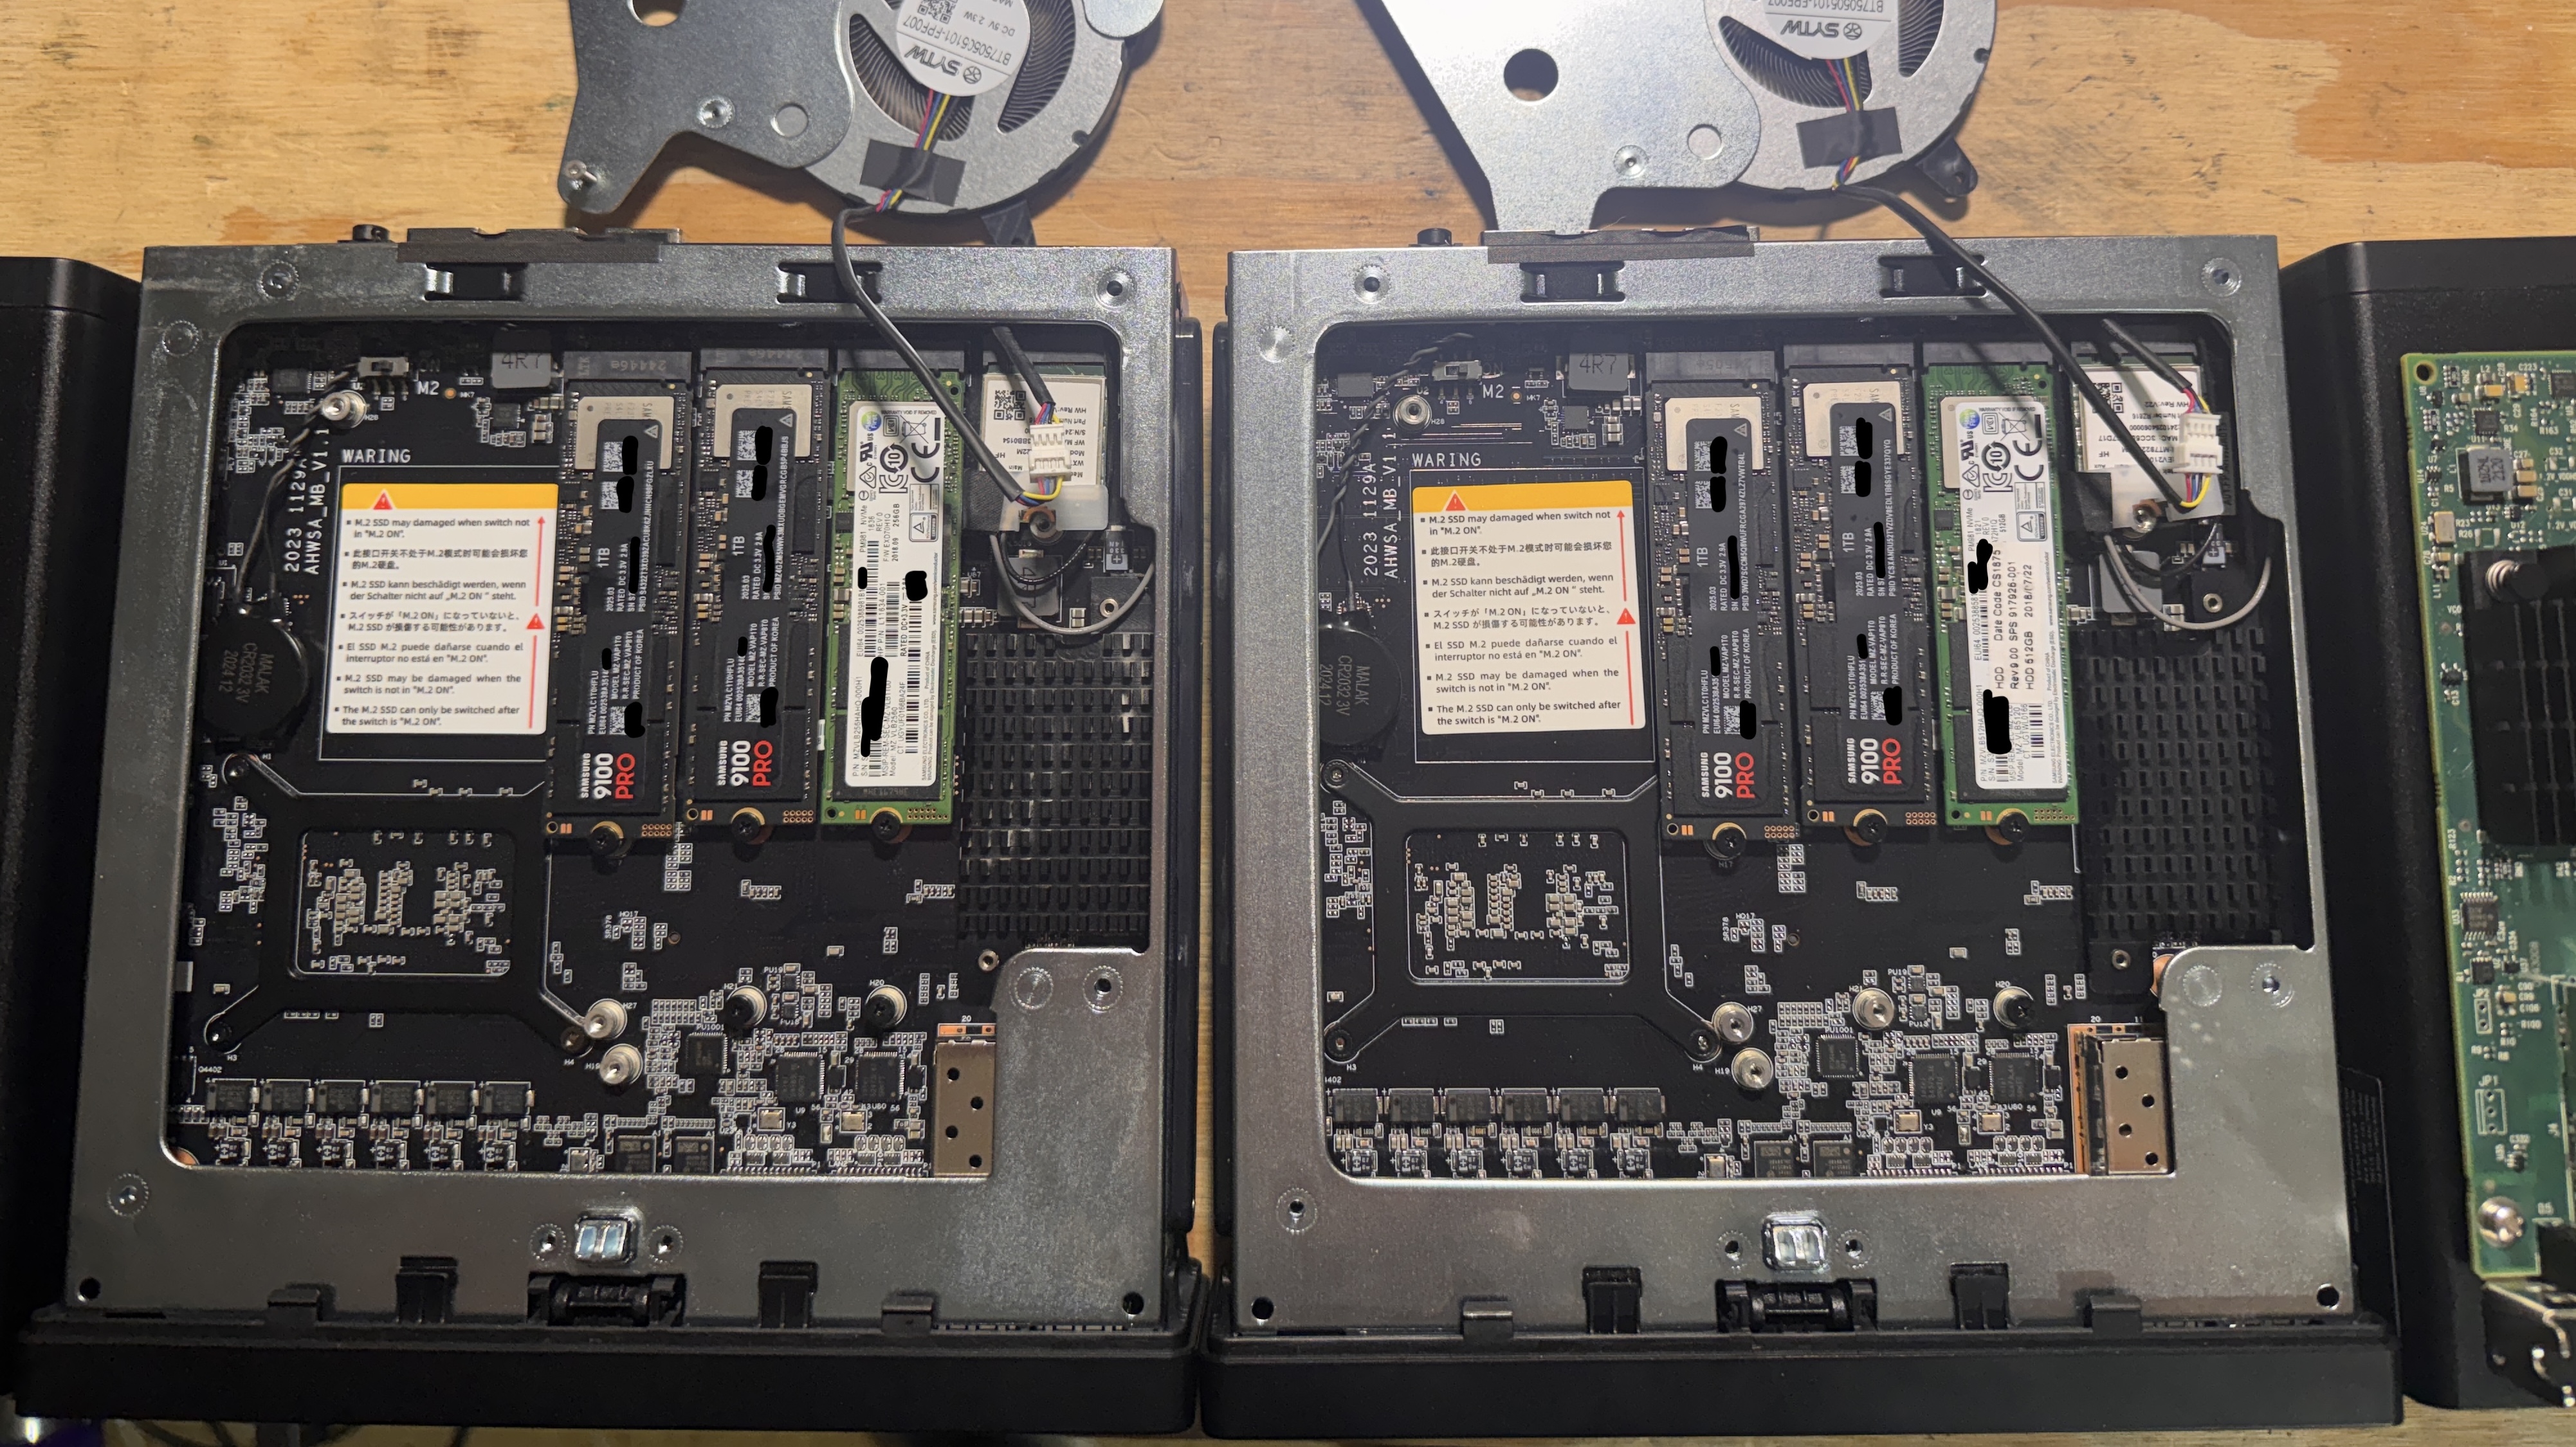
Additionally, I started off with a big lot of enterprise 1.92TB M.2 PM983 NVMe’s. The MS-01’s refused boot into an OS with the PM983’s regardless of which slot, how many drives, etc. I ended up getting Samsung 9100 Pros that work fine, but are about half the size and don’t have the same Power Loss Prevention capabilities.
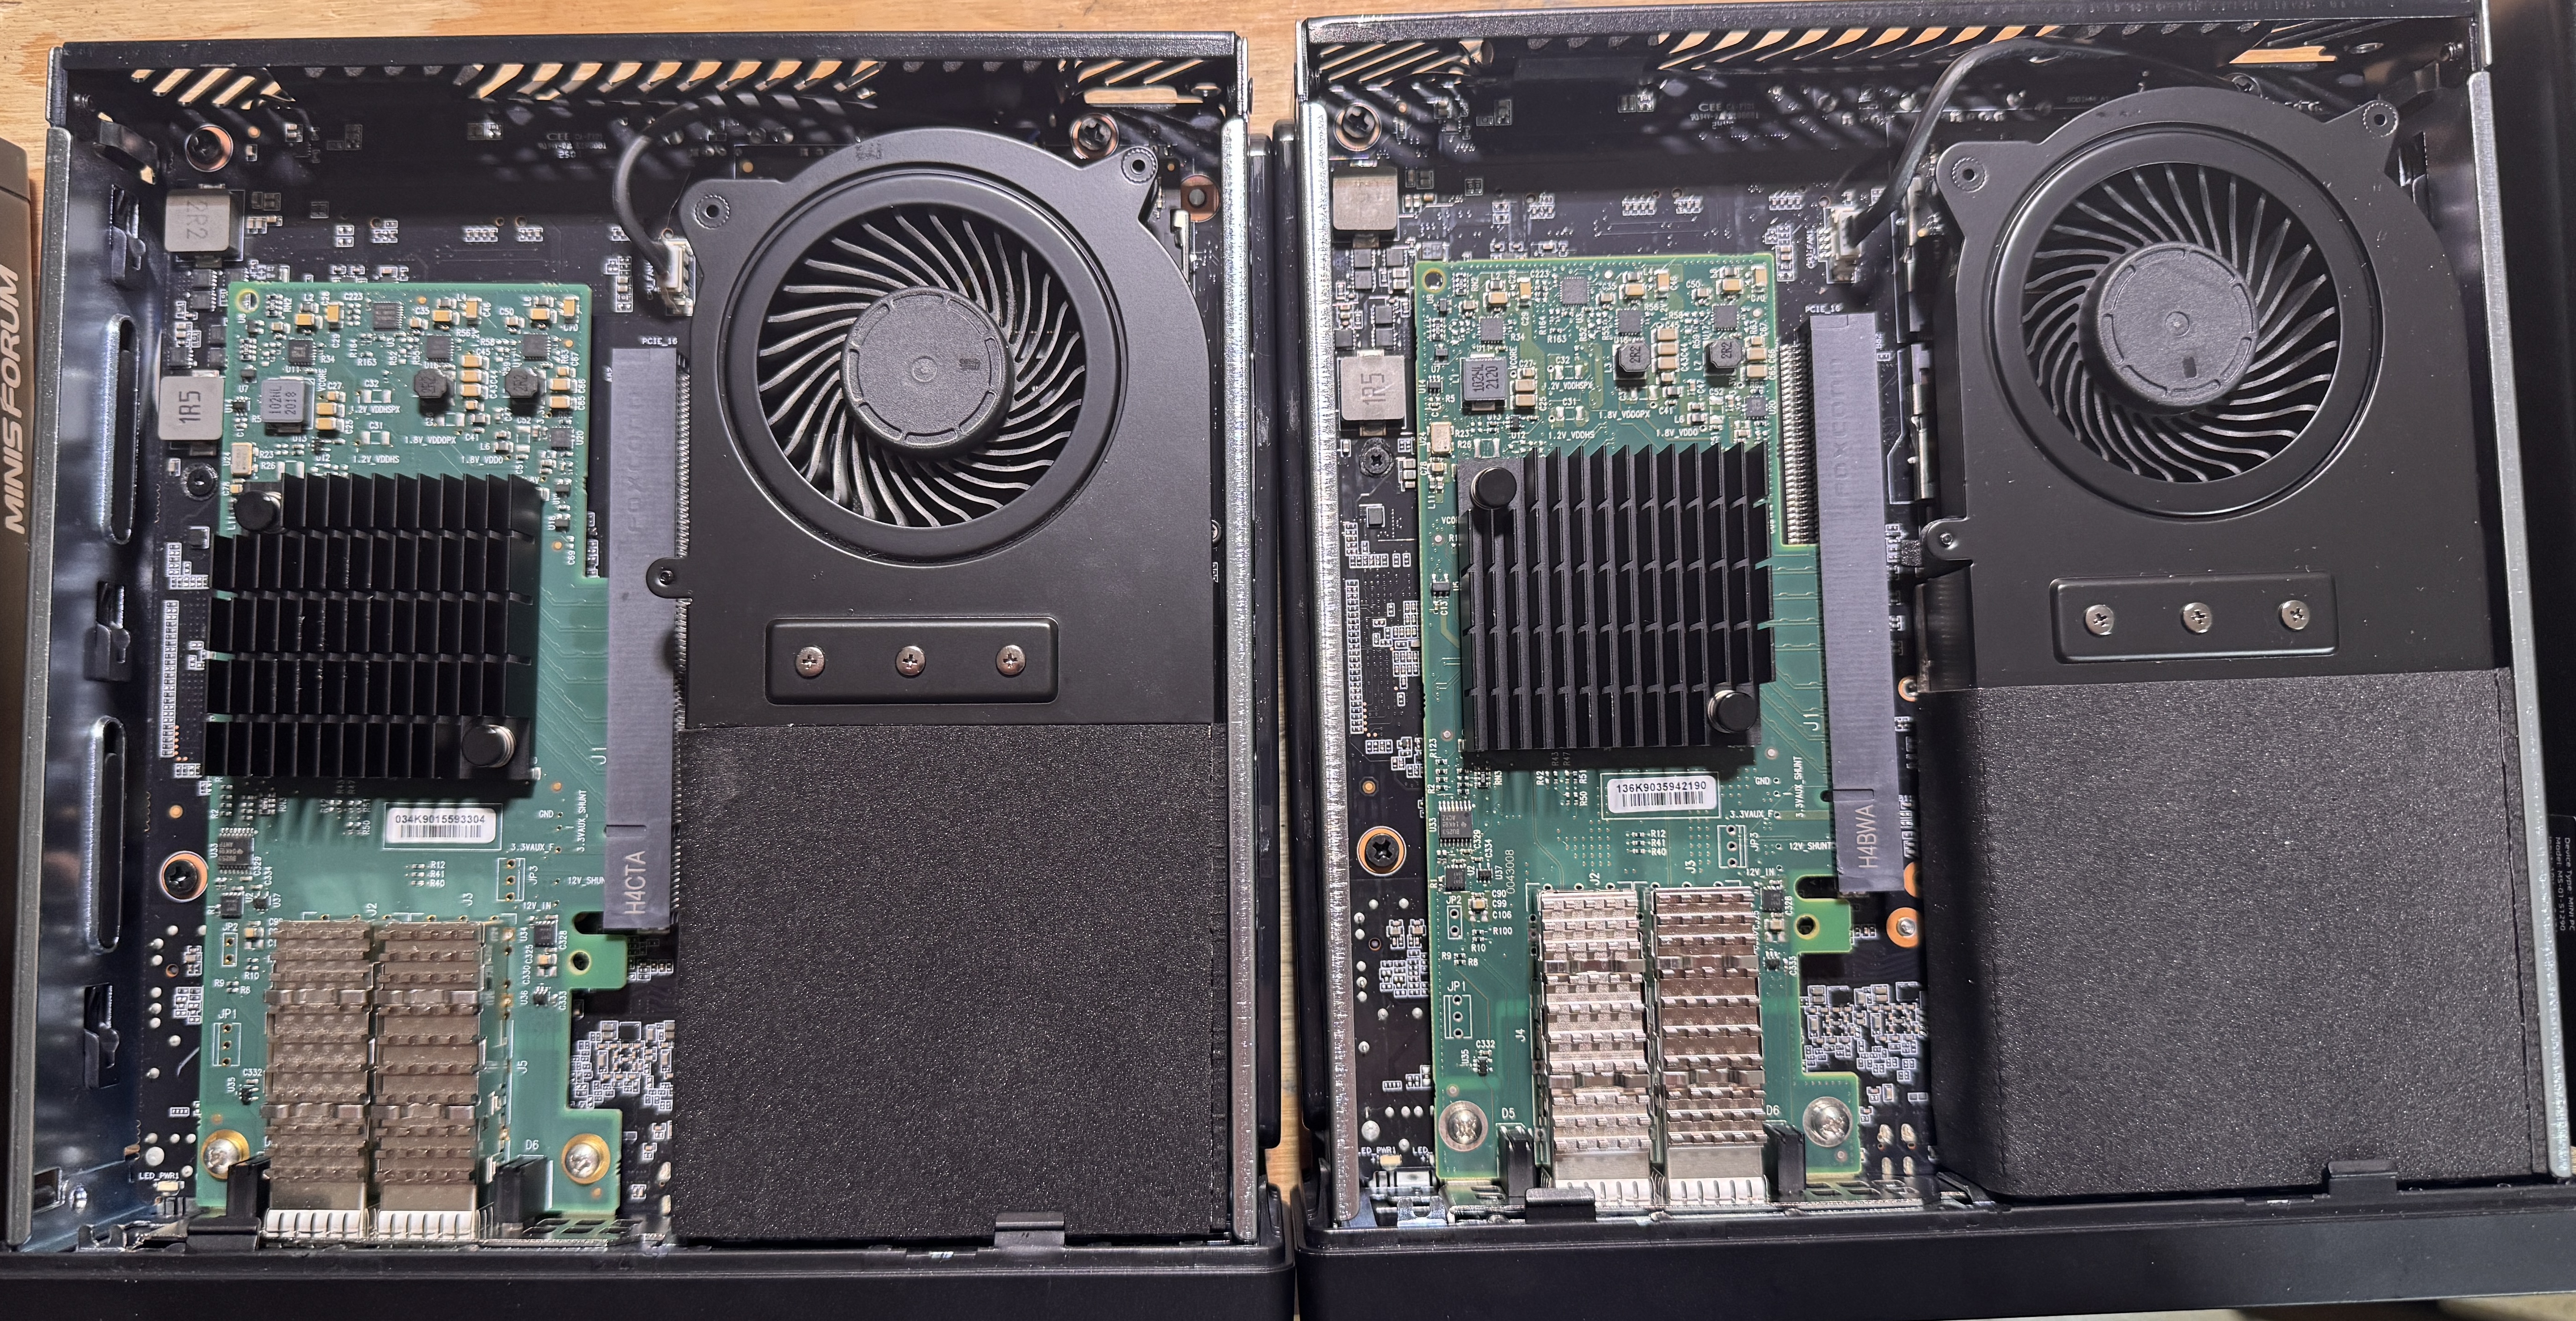
So I eventually settled on putting a Mellanox ConnectX-4 lx nic in each node for the storage intent and put Compute and Management traffic on the X710. That of course meant no QNAP card, and only 3x SSD per node. Let me emphasize, nearly every part of this is unsupported, and even if it was, it doesn’t work all that great compared to real servers. You should not use this for your business. But, it can be a fun little homelab cluster.
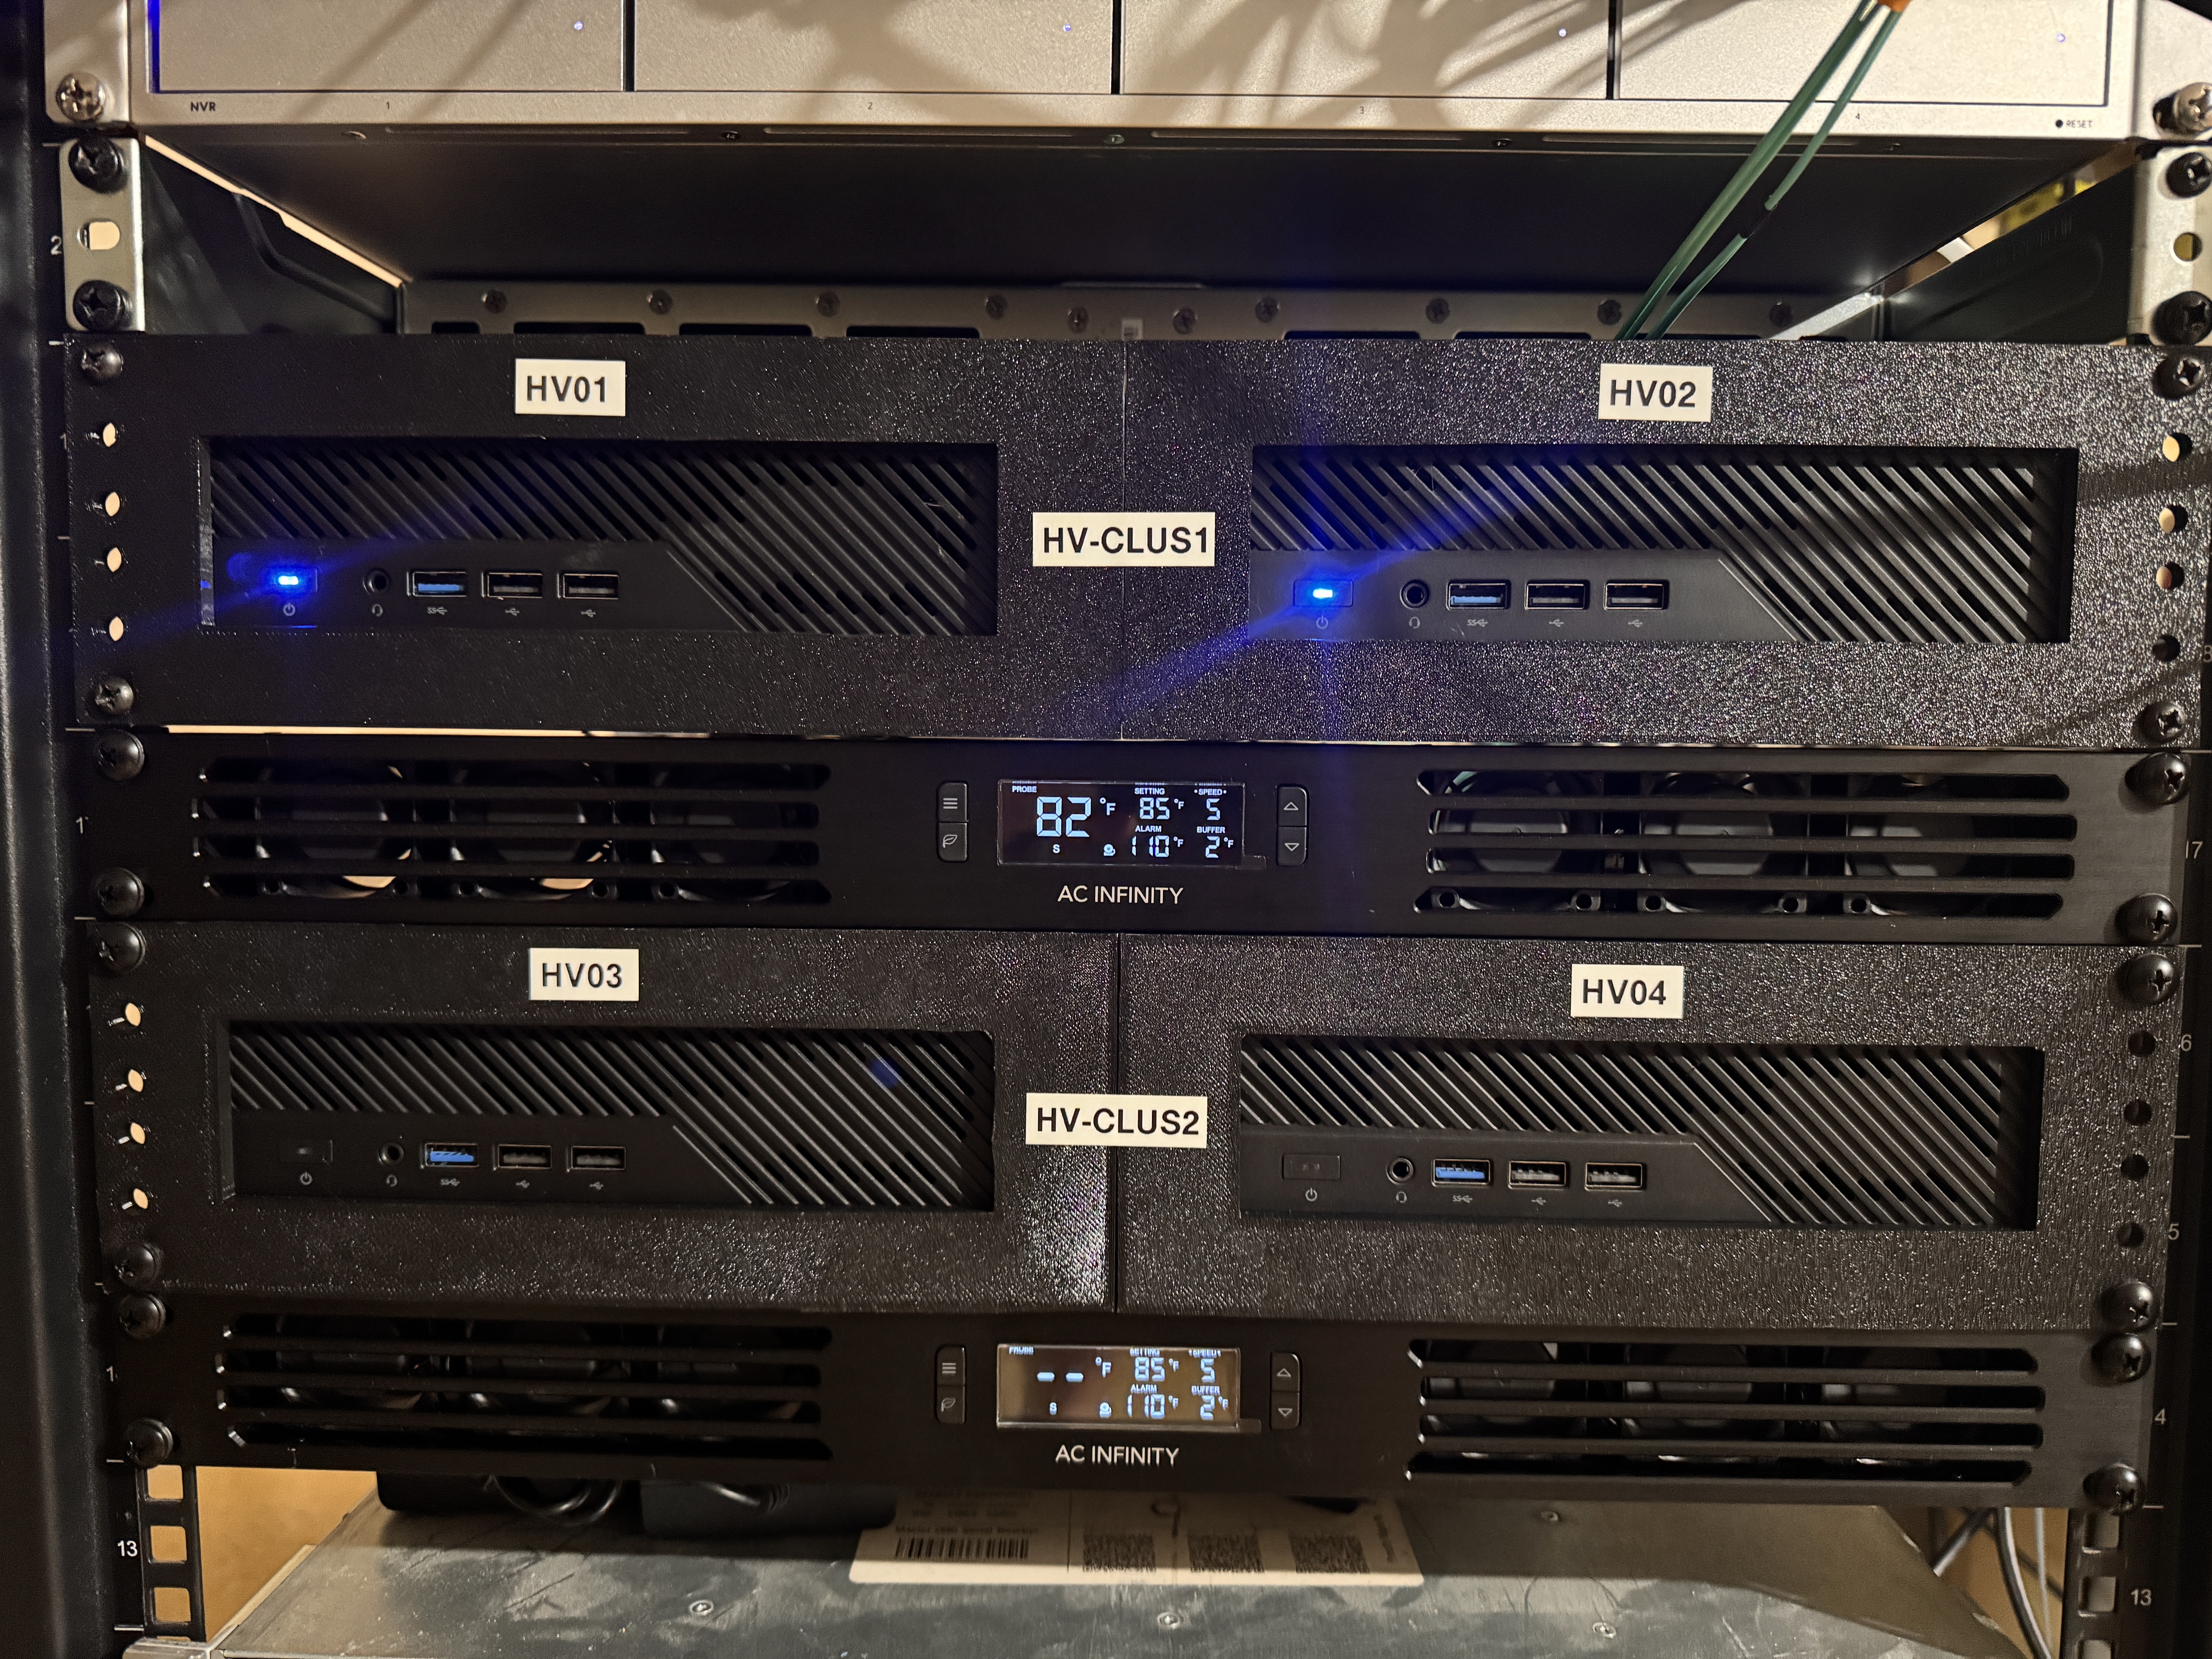
Hardware Setup
Hardware
First up, the hardware I used:
| Part | Model |
|---|---|
| CPU | i9-12900H (14c/20t) |
| RAM | 2x 48GB DDR5 Crucial |
| Boot SSD | Random old NVMe |
| Data SSD | 2x Samsung 9100 Pro 1TB |
| Nic | Mellanox ConnectX-4 lx |
Step 1 is of course to install everything. When it comes to SSD placement, make sure to put the boot drive in the slot furthest to the right. That slot only runs at PCIe 3.0x2 so we don’t want to use that for a real data drive. Also, make sure that the M.2/U.2 switch is set to M.2, or you’re going to have a really bad day.
BIOS
Once they’re all put together, onto the BIOS Setup.
- All of my nodes shipped with BIOS 1.26, which seemed to work fine for me, but if you bought used I’d make sure both nodes are on the same version.
- If you bought used, go ahead and reset to factory defaults. If you bought new, maybe do it anyways. I’ve seen some weird things with these guys.
- Advanced menu.
- Trusted Computing:
- Enable SHA384 and SM3_256 PCR Banks
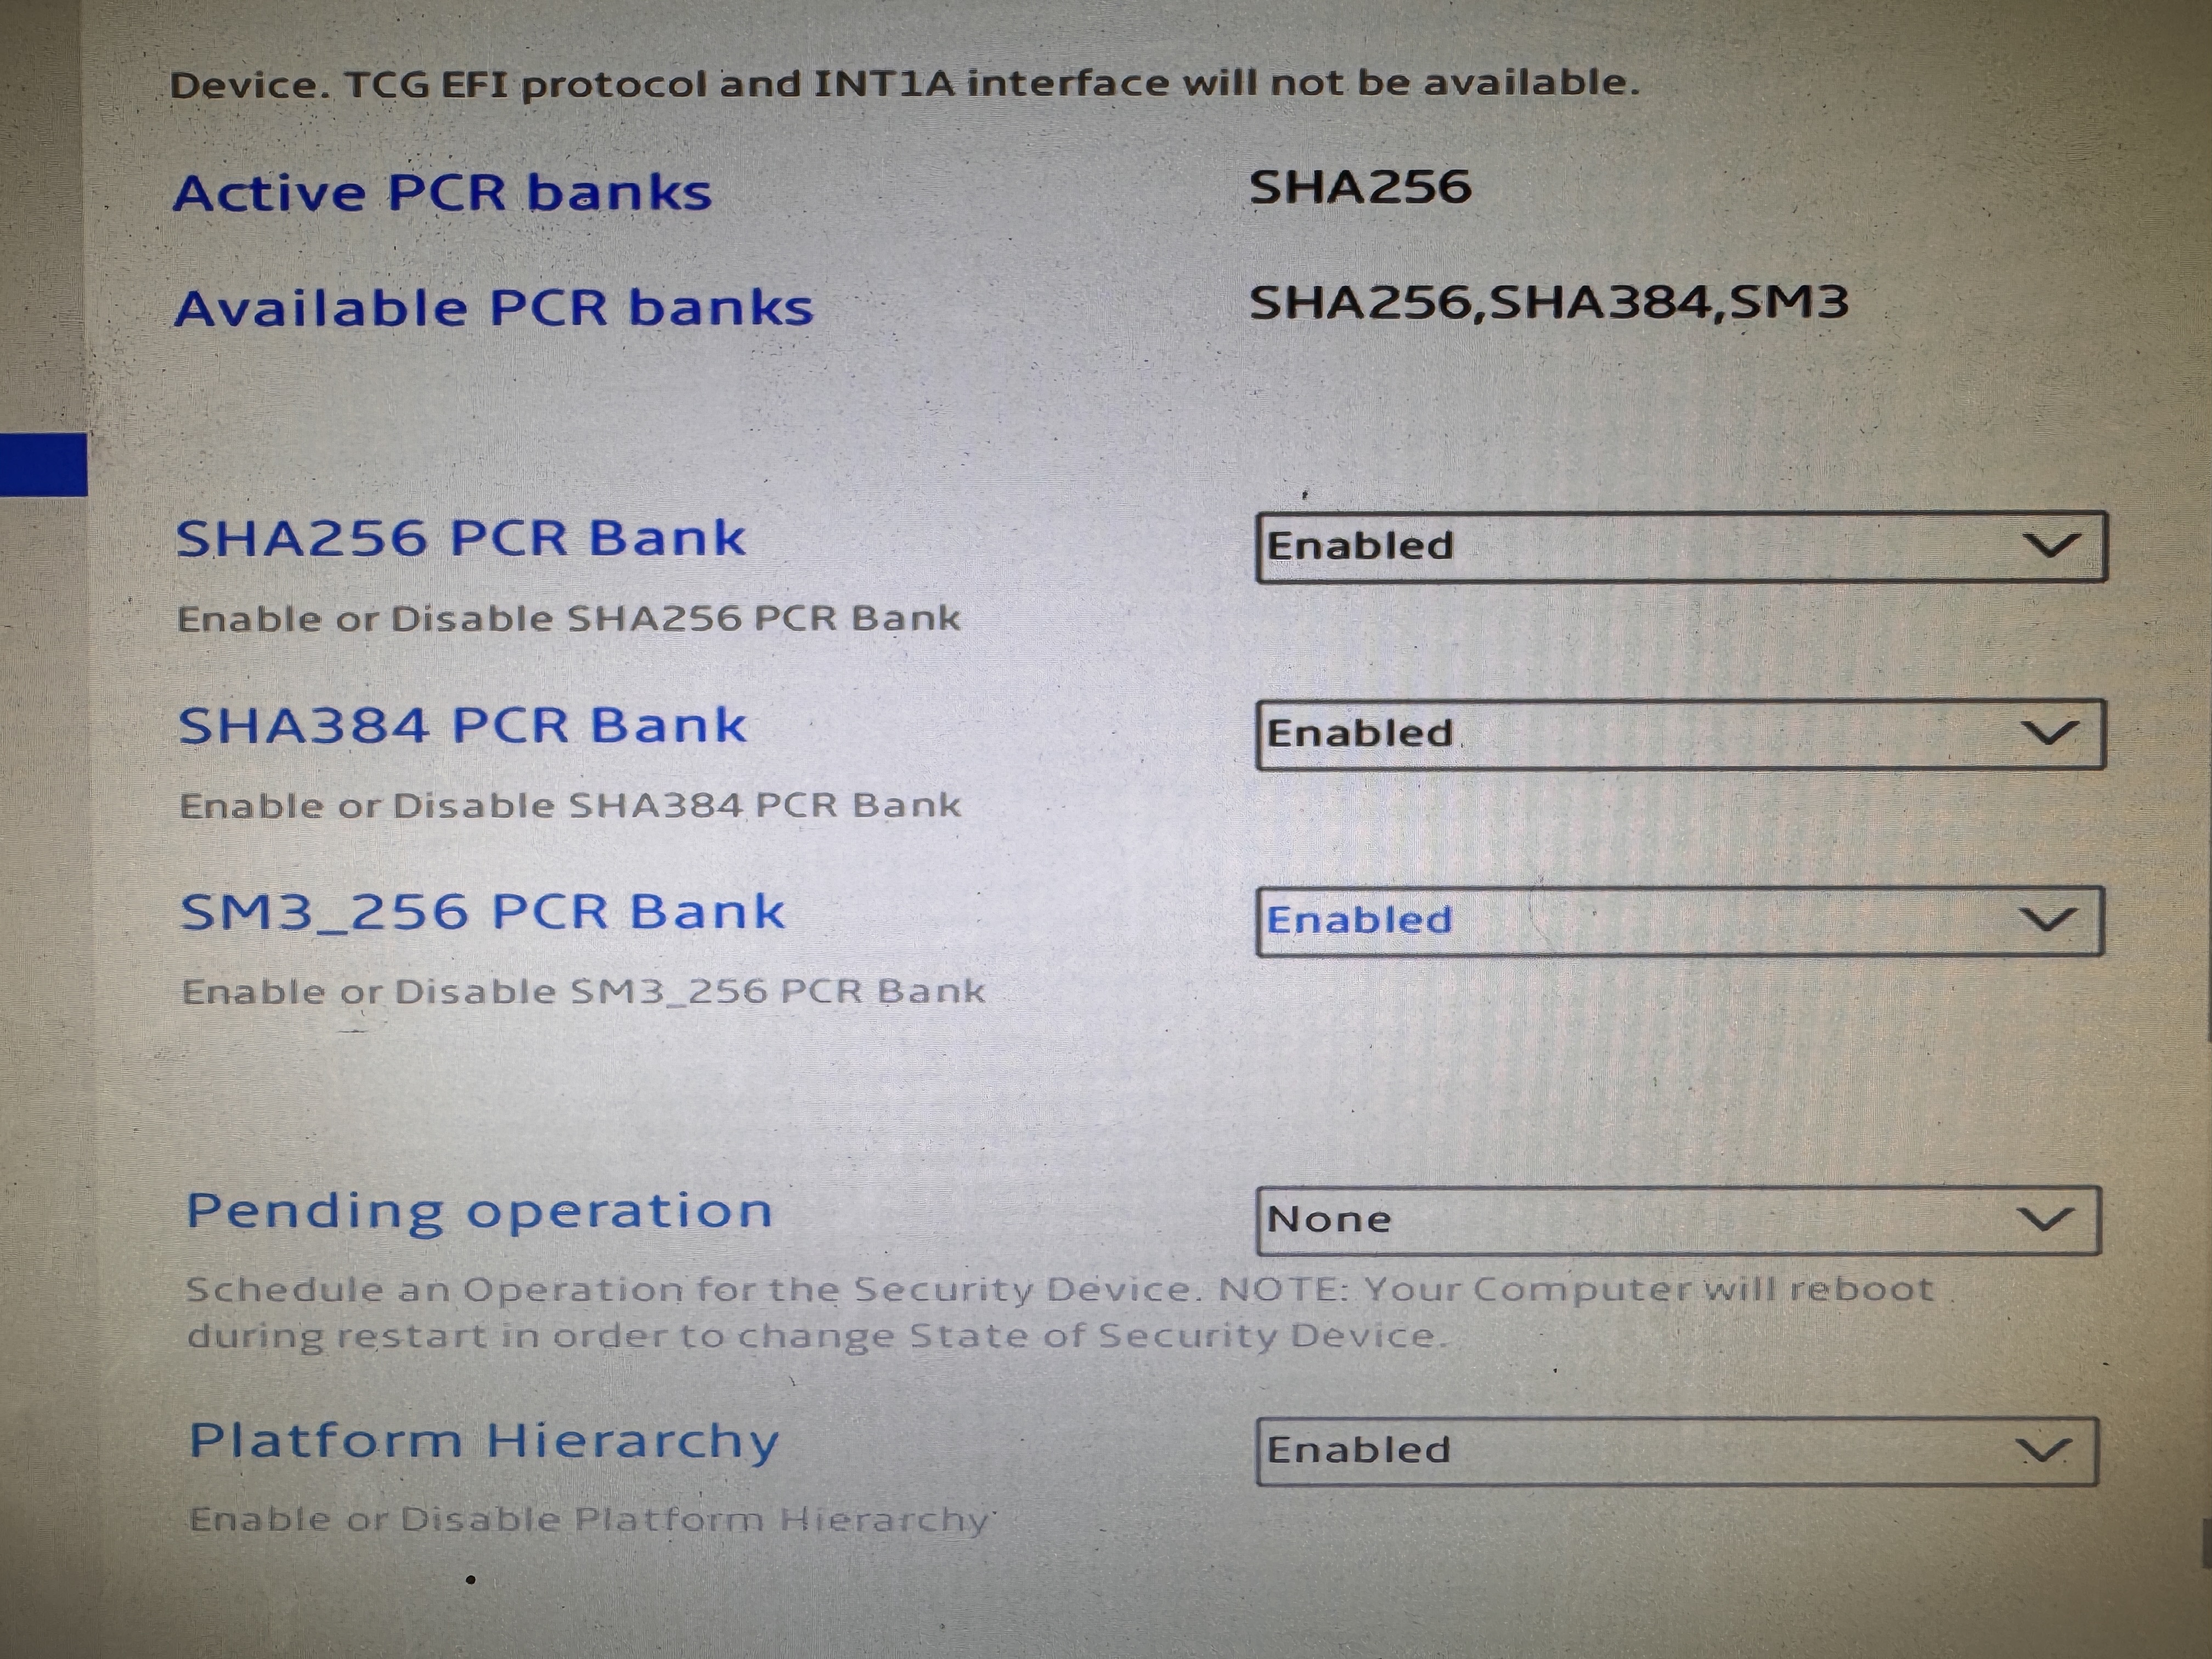
- Enable SHA384 and SM3_256 PCR Banks
- Onboard Devices Settings:
- DVMT Pre-Allocated: 48M
- Aperture Size: 128MB
- ACPI Settings:
- Restore (Restory?) on AC Power Loss: Last State
- Restore (Restory?) on AC Power Loss: Last State
- HW Monitor & Smart Fan:
- Set all fans to “Full Mode”. These boxes are still going to run plenty warm, and at full speed they’re still quieter than my other servers.
- Set all fans to “Full Mode”. These boxes are still going to run plenty warm, and at full speed they’re still quieter than my other servers.
- Trusted Computing:
AD prep
Lots of this is optional, and environmental based. But this is what I did ahead of time to make things easier.
- Create OU for HV Clusters, with a sub OU for this particular cluster.
- Create and link GPO to allow RDP and Remote Powershell.
- Create and link GPO to configure W32TM (NTP) settings.
- Create and link GPO to use Deliver Optimization on the local network.
- Create and link GPO to disable Interactive Logon CTRL+ALT+DEL.ß
- Create and link GPO to allow necessary Windows Firewall rules.
- RDP
- ICMP (Ping)
- File and Printer Sharing (SMB)
- WinRM
- WMI
- Delivery Optimization
- Performance Logs and Alerts
- Virtual Machine Monitoring
Initial OS Setup
I used the absolute latest version of Windows Server vNext, but feel free to use the retail release of Windows Server 25 if you’d like.
- Prep Windows Server on a USB drive
- Boot, and install Windows Server to the boot NVMe.
- If you did vNext, you can use the public vNext activation key “2KNJJ-33Y9H-2GXGX-KMQWH-G6H67”
- Set an admin password, and login.
- Do a Rename-Computer and restart
1Rename-Computer -NewName HV01 -Restart - Join the Domain
- Move the computer objects to the dedicated OU now, not later.
- Restart the computer
1Restart-Computer - Set the timezone.
1Set-TimeZone -Id "Central Standard Time" - Set Power Plan to High Performance
1Powercfg -setactive 8c5e7fda-e8bf-4a96-9a85-a6e23a8c635c - Set minimum processor state to 25%
1Powercfg -setacvalueindex 8c5e7fda-e8bf-4a96-9a85-a6e23a8c635c 54533251-82be-4824-96c1-47b60b740d00 893dee8e-2bef-41e0-89c6-b55d0929964c 25
Drivers
- Download Mellanox Drivers: https://network.nvidia.com/products/adapter-software/ethernet/windows/winof-2/
- You need the WinOF-2 driver, and use the latest 25./26.version, not the 3. LTS.
- Download Mellanox firmware for your specific card: https://network.nvidia.com/support/firmware/connectx4lxen/
- I know it’s a pain to figure out the part number, but you do want the latest firmware.
- Download MS-01 driver package: https://www.minisforum.com/pages/product-info
- Scroll down to MS-01, expand “Drivers & Downloads” then click on the “Driver Package” link
- This package actually has lots of fun unsupported stuff in it. It has an i226 driver that will actually install on Windows Server 2025 if you want to try that.
- Download Intel X710 WS2025 driver package: https://www.intel.com/content/www/us/en/support/products/82947/ethernet-products/700-series-controllers-up-to-40gbe/intel-ethernet-controller-x710.html
- We are downloading this for the NVM Firmware, DO NOT INSTALL THE X710 DRIVERS.
- You may have to scroll down for the “Intel® Network Adapter Driver for Windows Server 2025*” package
- Install Mellanox drivers
- Install Chipset Drivers (MS-01 #1)
- Install Graphics Drivers (MS-01 #4)
- DO NOT INSTALL X710 DRIVERS FROM INTEL. I tried all sorts of versions, they just don’t work. Let windows updates give you the 1.10.128 version. I have an email out to Intel, and will hopefully have a new working version I can update this with.
- Update the X710 Firmware (NVMUpdate included in teh X710 driver package)
- Optionally install i226, ME, Etc.
- Restart the computer
1Restart-Computer
Host Network Prep
This part is pretty important, and will help set you up for Failover Clustering health checks, and Network ATC Configuration.
- Don’t forget to manually set the switchless IPs
| NIC | HV21 | HV22 | VLAN |
|---|---|---|---|
| vManagement | 10.10.50.21/2 | 10.10.50.22/24 | 50 |
| CX4-1 | 10.71.1.21/24 | 10.71.1.22/24 | 700 |
| CX4-2 | 10.71.2.21/24 | 10.71.2.22/24 | 700 |
Cluster IP: 10.10.50.20
Rename Network Adapters (Sometimes optional, but nice)
You will need to substitute the proper -Name and -NewName depending on the order in which your adapters got named by default. Windows lies to kinda randomly populate and names Nics, as you can see in my screenshot. It is important to name the ports on the card by their MAC address order.
 1Get-NetAdapter | Sort MacAddress
 2
 3Rename-NetAdapter -Name 'Ethernet' -NewName 'CX4-1'
 4Rename-NetAdapter -Name 'Ethernet 2' -NewName 'CX4-2'
 5Rename-NetAdapter -Name 'Ethernet 3' -NewName 'X710-1'
 6Rename-NetAdapter -Name 'Ethernet 4' -NewName 'X710-2'
 7
 8#Node1
 9New-NetIPAddress -IPAddress 10.71.1.21 -InterfaceAlias "CX4-1" -Prefixlength 24
10New-NetIPAddress -IPAddress 10.71.2.21 -InterfaceAlias "CX4-2" -Prefixlength 24
11New-NetIPAddress -IPAddress 10.10.50.21 -InterfaceAlias "X710-1" -Prefixlength 24 -DefaultGateway 10.10.50.1
12#Node2
13New-NetIPAddress -IPAddress 10.71.1.22 -InterfaceAlias "CX4-1" -Prefixlength 24
14New-NetIPAddress -IPAddress 10.71.2.22 -InterfaceAlias "CX4-2" -Prefixlength 24
15New-NetIPAddress -IPAddress 10.10.50.22 -InterfaceAlias "X710-1" -Prefixlength 24 -DefaultGateway 10.10.50.1
16
17Get-NetAdapter -Name 'X710-1' | Set-DnsClientServerAddress -ServerAddresses ("10.10.50.51","10.10.50.52","10.10.50.53")
Cluster Configuration
- First, we’re going to check that the data drives are ready to be pooled. At this point, you will have to run this on each node.
1Get-PhysicalDisk
- IF any of your drives are listed as “CanPool=False” then you can run the command from Microsoft to clean them. https://learn.microsoft.com/en-us/windows-server/storage/storage-spaces/deploy-storage-spaces-direct#step-31-clean-drives
- Add Roles and Features. You 100% want to do this from powershell, not server manager.
1Install-WindowsFeature -Name "Hyper-V", "Failover-Clustering", "Data-Center-Bridging", "RSAT-Clustering-PowerShell", "Hyper-V-PowerShell", "FS-FileServer”, “NetworkATC” -IncludeAllSubFeature -IncludeManagementTools -Restart - FCM Validation:
- Open Failover Cluster Manager. If you did server core, you will need to do this from a management machine.
- In the top right, click “Validate Configuration”
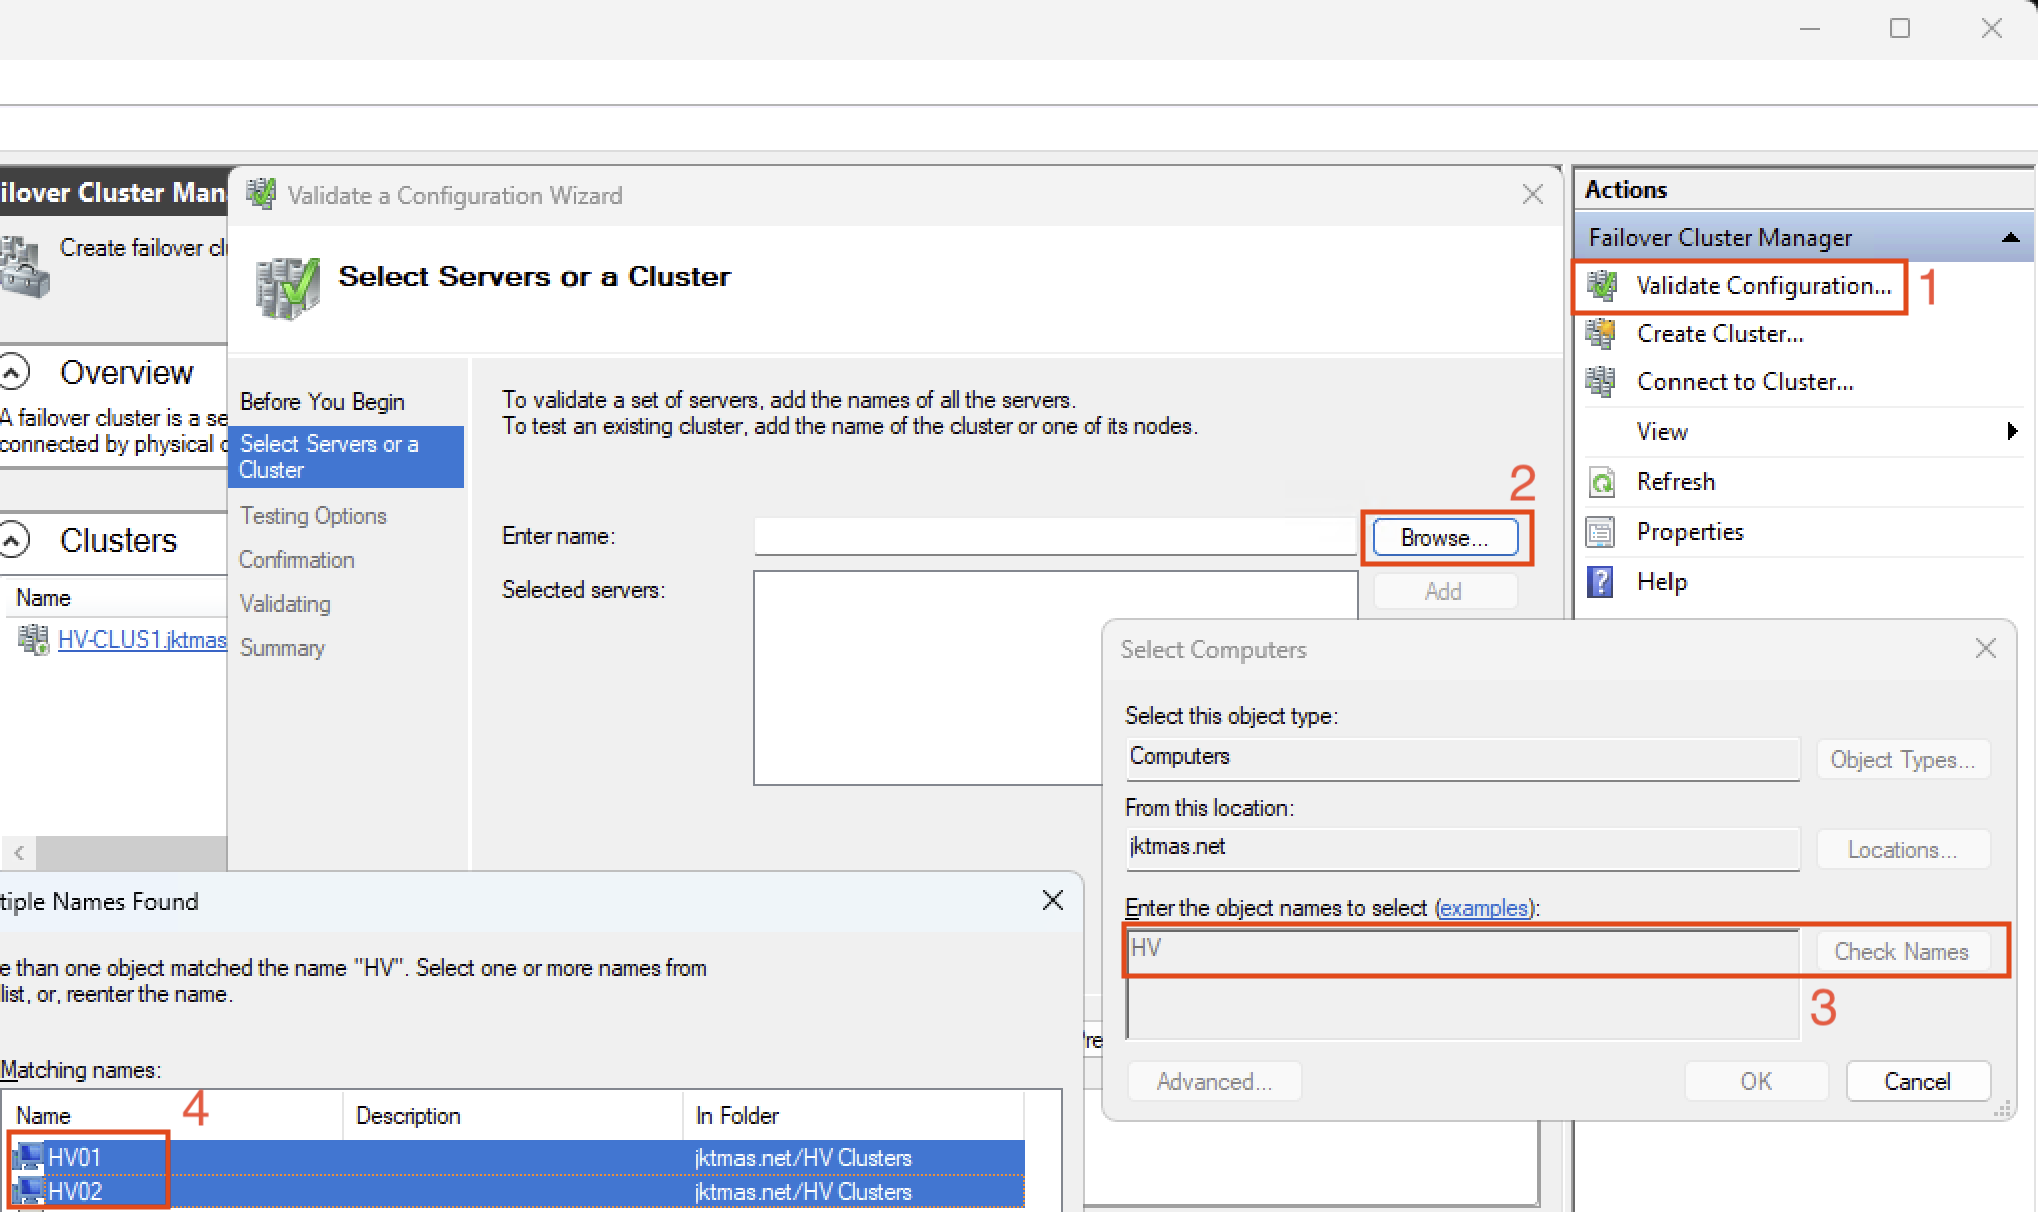
- It will take a few minutes to validate, and provide a report. There may be some errors or warnings, and you should view the report and check them all.
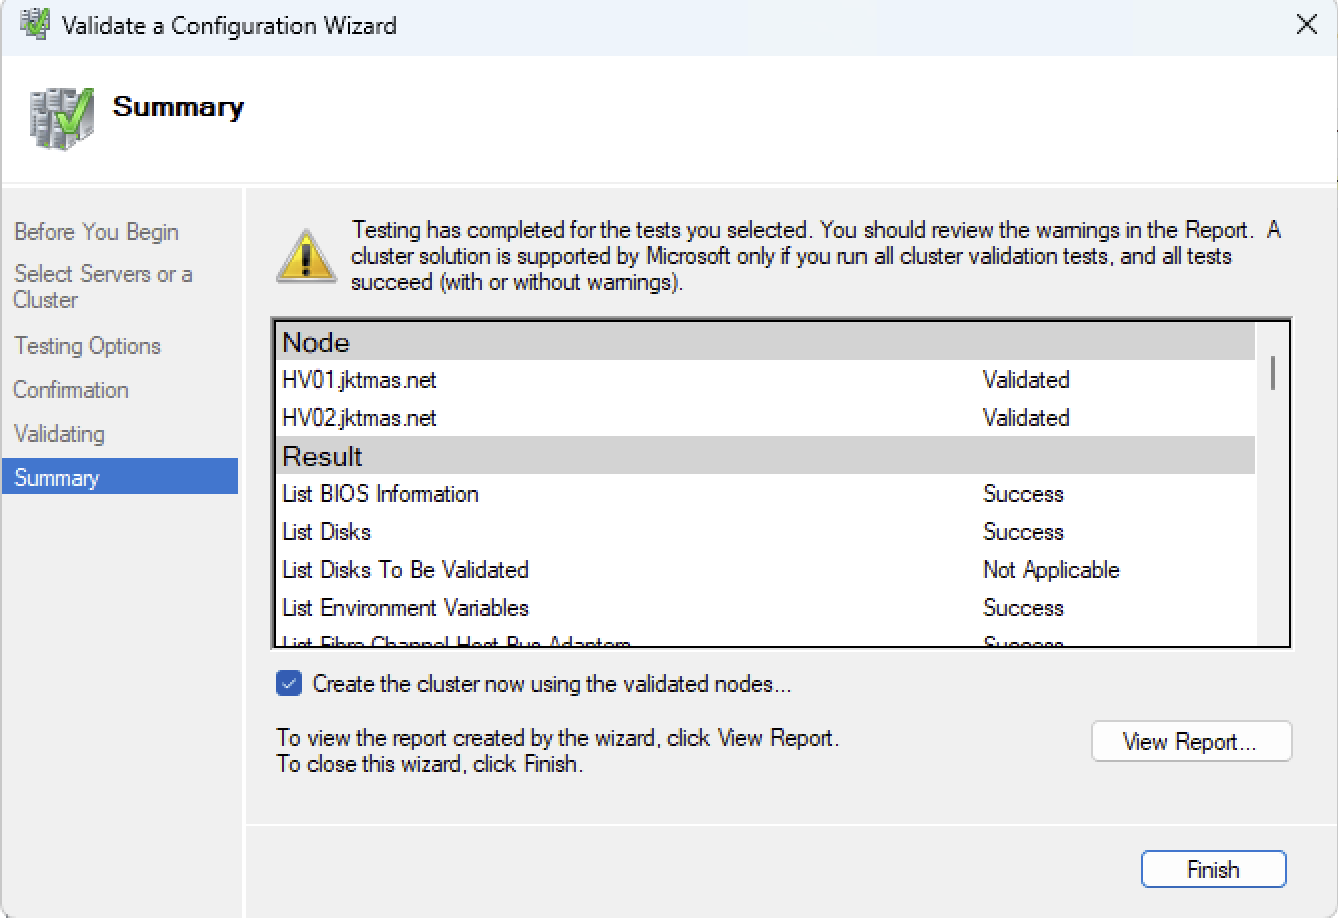
- Assuming everything else in the validation report looks good, click the “Create the cluster now using the validated nodes” box, and click finish.
- Fill in the name and IP you’d like to provide the cluster, click next a couple of times, and click create.
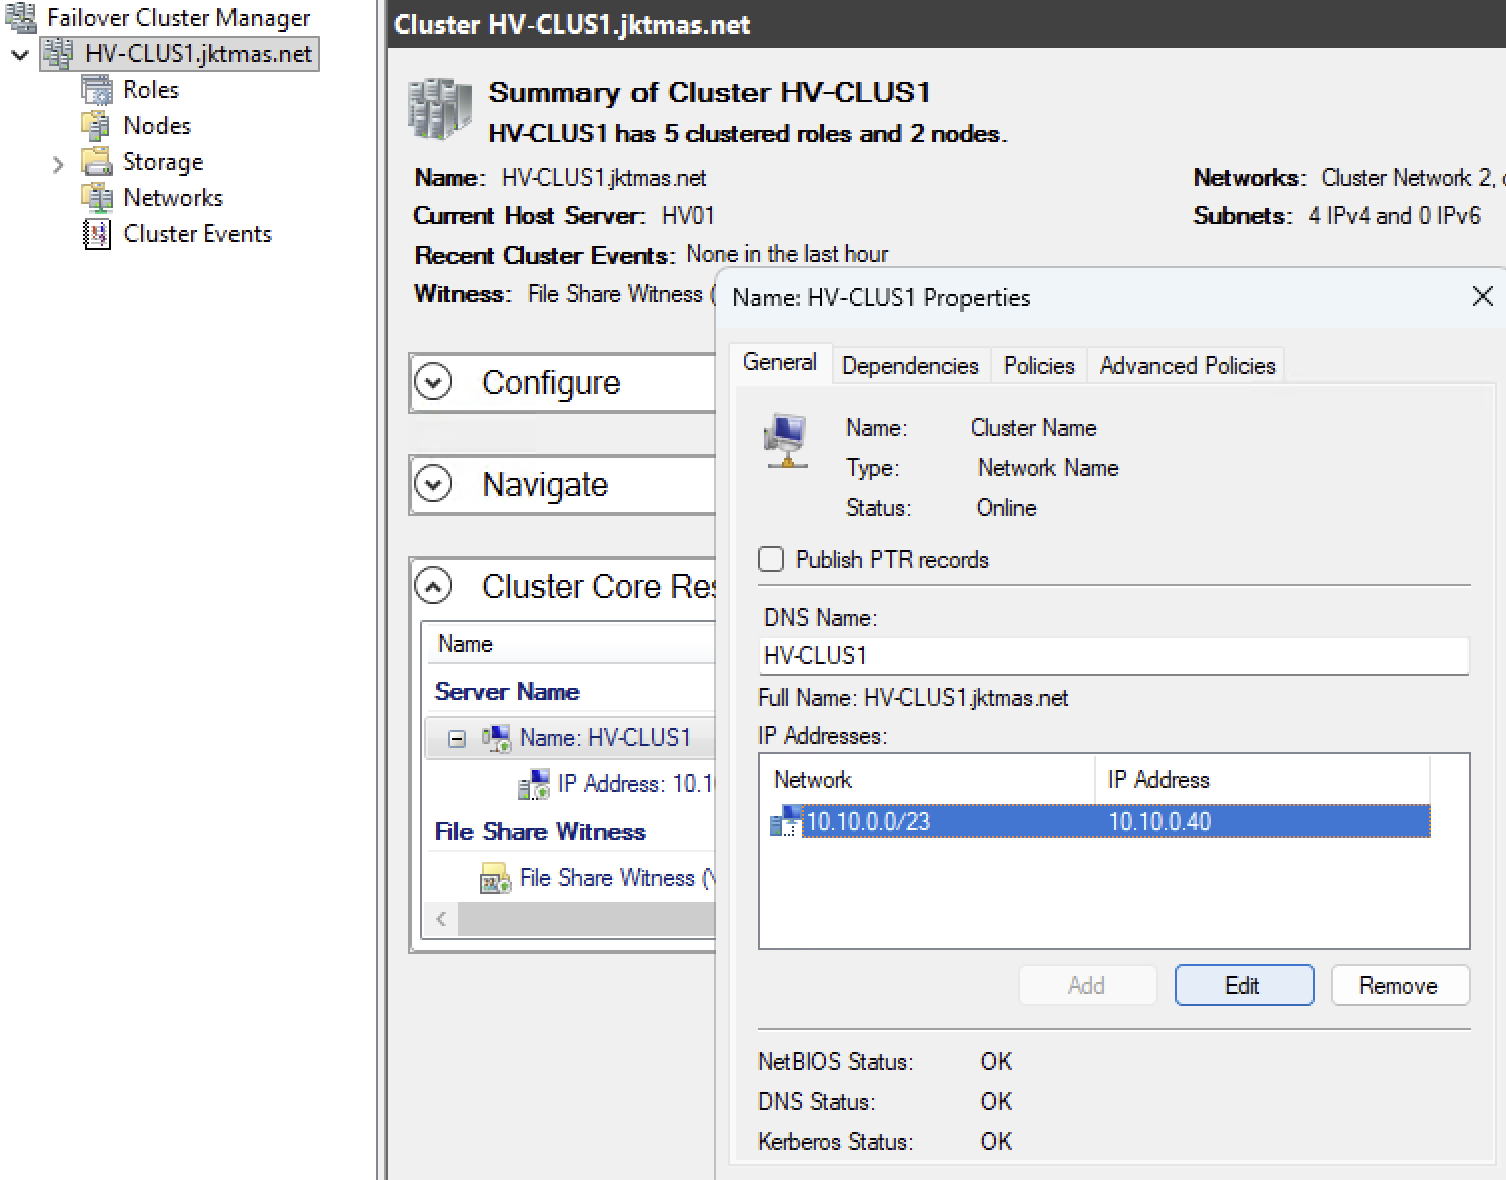
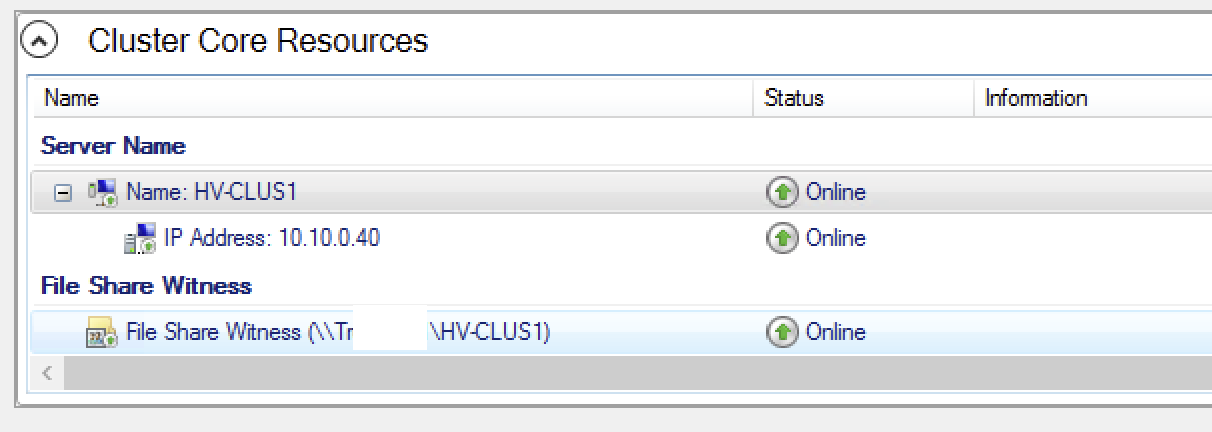
- From the cluster overview page, go to “Cluster Core Resources”, and right click on the “Server Name” object with your clusters name. Go to properties, Select the network address and click edit, and make sure everything looks OK. Optionally also select “publish PRT records” and click OK again.
Network ATC
- This section assumes you are using the same exact network setup as me, but this will hopefully at least give you a good starting point to understand ATC. You only have to do this on one node, and it will apply to the whole cluster.
- First, create the intent
1$MgmtAdapterPropertyOverrides = New-NetIntentAdapterPropertyOverrides 2$MgmtAdapterPropertyOverrides.NetworkDirect = 0 3$MgmtAdapterPropertyOverrides.JumboPacket = 1514 4$StorAdapterPropertyOverrides = New-NetIntentAdapterPropertyOverrides 5$StorAdapterPropertyOverrides.JumboPacket = 9014 6#RoCEv2=4, iWARP=1 7$StorAdapterPropertyOverrides.NetworkDirectTechnology = 4 8$StorageOverride = New-NetIntentStorageOverrides 9$StorageOverride.EnableAutomaticIPGeneration = $false 10 11Add-NetIntent -Name Compute_Management -Management -Compute -AdapterName X710-1, X710-2 -ManagementVlan 50 -AdapterPropertyOverrides $MgmtAdapterPropertyOverrides 12 13Add-NetIntent -Name Storage -Storage -AdapterName CX4-1, CX4-2 -AdapterPropertyOverrides $StorAdapterPropertyOverrides -StorageOverrides $Storageoverride - Next, we need to get the status and make sure it’s succeeded. DO NOT CONTINUE UNTIL THIS IS COMPLETE
1Get-NetIntentStatus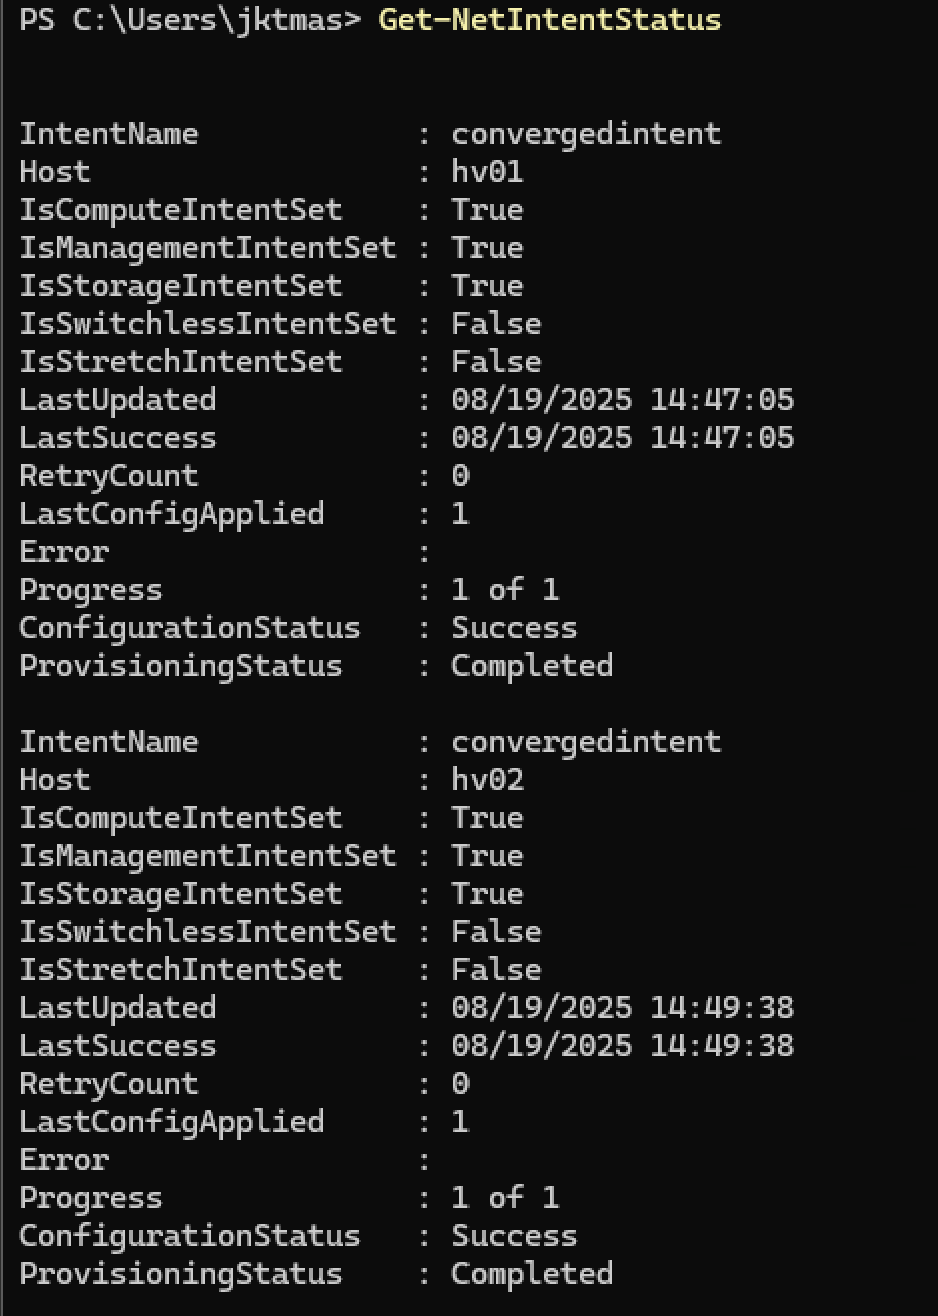
- If you’re looking for some alternate Network ATC setup configurations, Lee has a great blog post here: https://www.hciharrison.com/azure-stack-hci/network-atc/ and I’m working on my own here: https://thomastechsystems.com/posts/network-atc-101/
- If you’re feeling really adventurous, and need to get the X710’s to work for storage, Network ATC will fail because they do not support RDMA. This is the same problem you’d have trying to use Network ATC in a VM or with any other non-RDMA Nics. Here are the necessary overrides to make it work. DO NOT DO THIS IF YOU HAVE RDMA CAPABLE NICS.
1$Override = New-NetIntentAdapterPropertyOverrides
2$Override.JumboPacket = "9014"
3$Override.NetworkDirect = $false
Set Up Cluster Aware Updating (CAU)
- First step here is often overlooked, and VERY important. Give the Cluster Name Object (CNO) full control of it’s OU!
- These are the parameters I chose to use for this lab cluster. I expect most of you to somewhat modify these settings.
1$Parameters = @{ 2 ClusterName = ‘HV-CLUS20' 3 DaysOfWeek = ‘Monday’, ‘Friday’ 4 WeeksOfMonth = ‘1’, ’2’, ‘3’, ‘4’ 5 MaxFailedNodes = ‘0’ 6 MaxRetriesPerNode = ‘3’ 7 RebootTimeoutMinutes = ‘30’ 8 SuspendClusterNodeTimeoutMinutes = ‘30’ 9 SuspendRetriesPerNode = ‘2’ 10 WaitForStorageRepairTimeoutMinutes = ‘60’ 11 RequireAllNodesOnline = $true 12 AttemptSoftReboot = $true 13 EnableFirewallRules = $true 14 Force = $true 15 } 16Add-CauClusterRole @Parameters - Then, we’ll check that it’s working.
1Get-CauClusterRole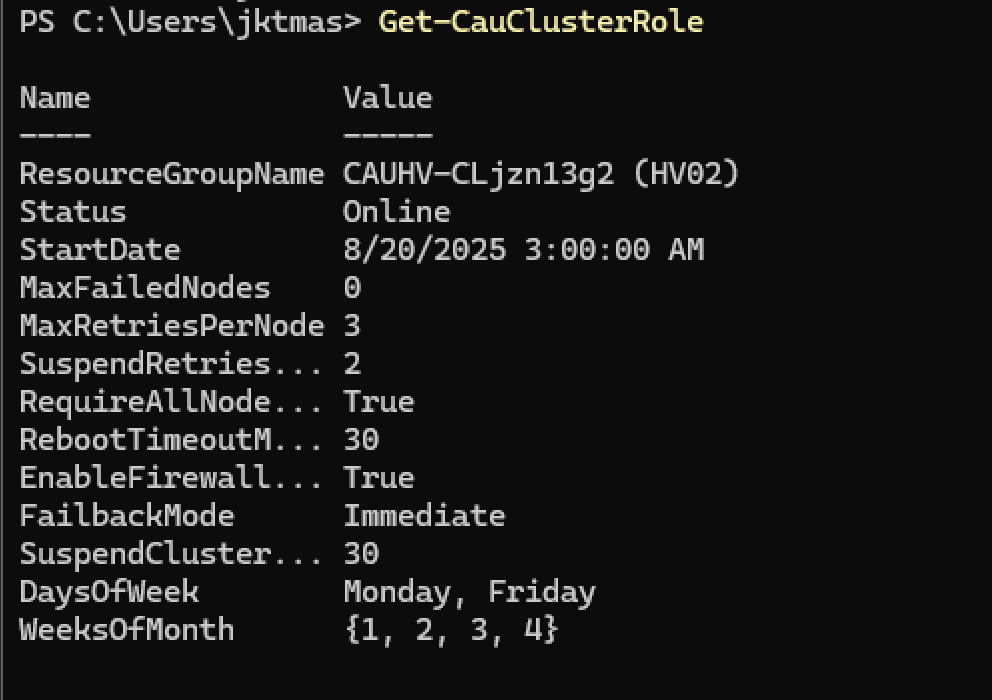
- Assuming it says Online, and the settings look right, you should be good. I did however run into an odd issue a few days after deployment. My CAU status went to Offline. Thankfully, super easy to check, and super easy to fix.
1Get-CauClusterRole
2Enable-CauClusterRole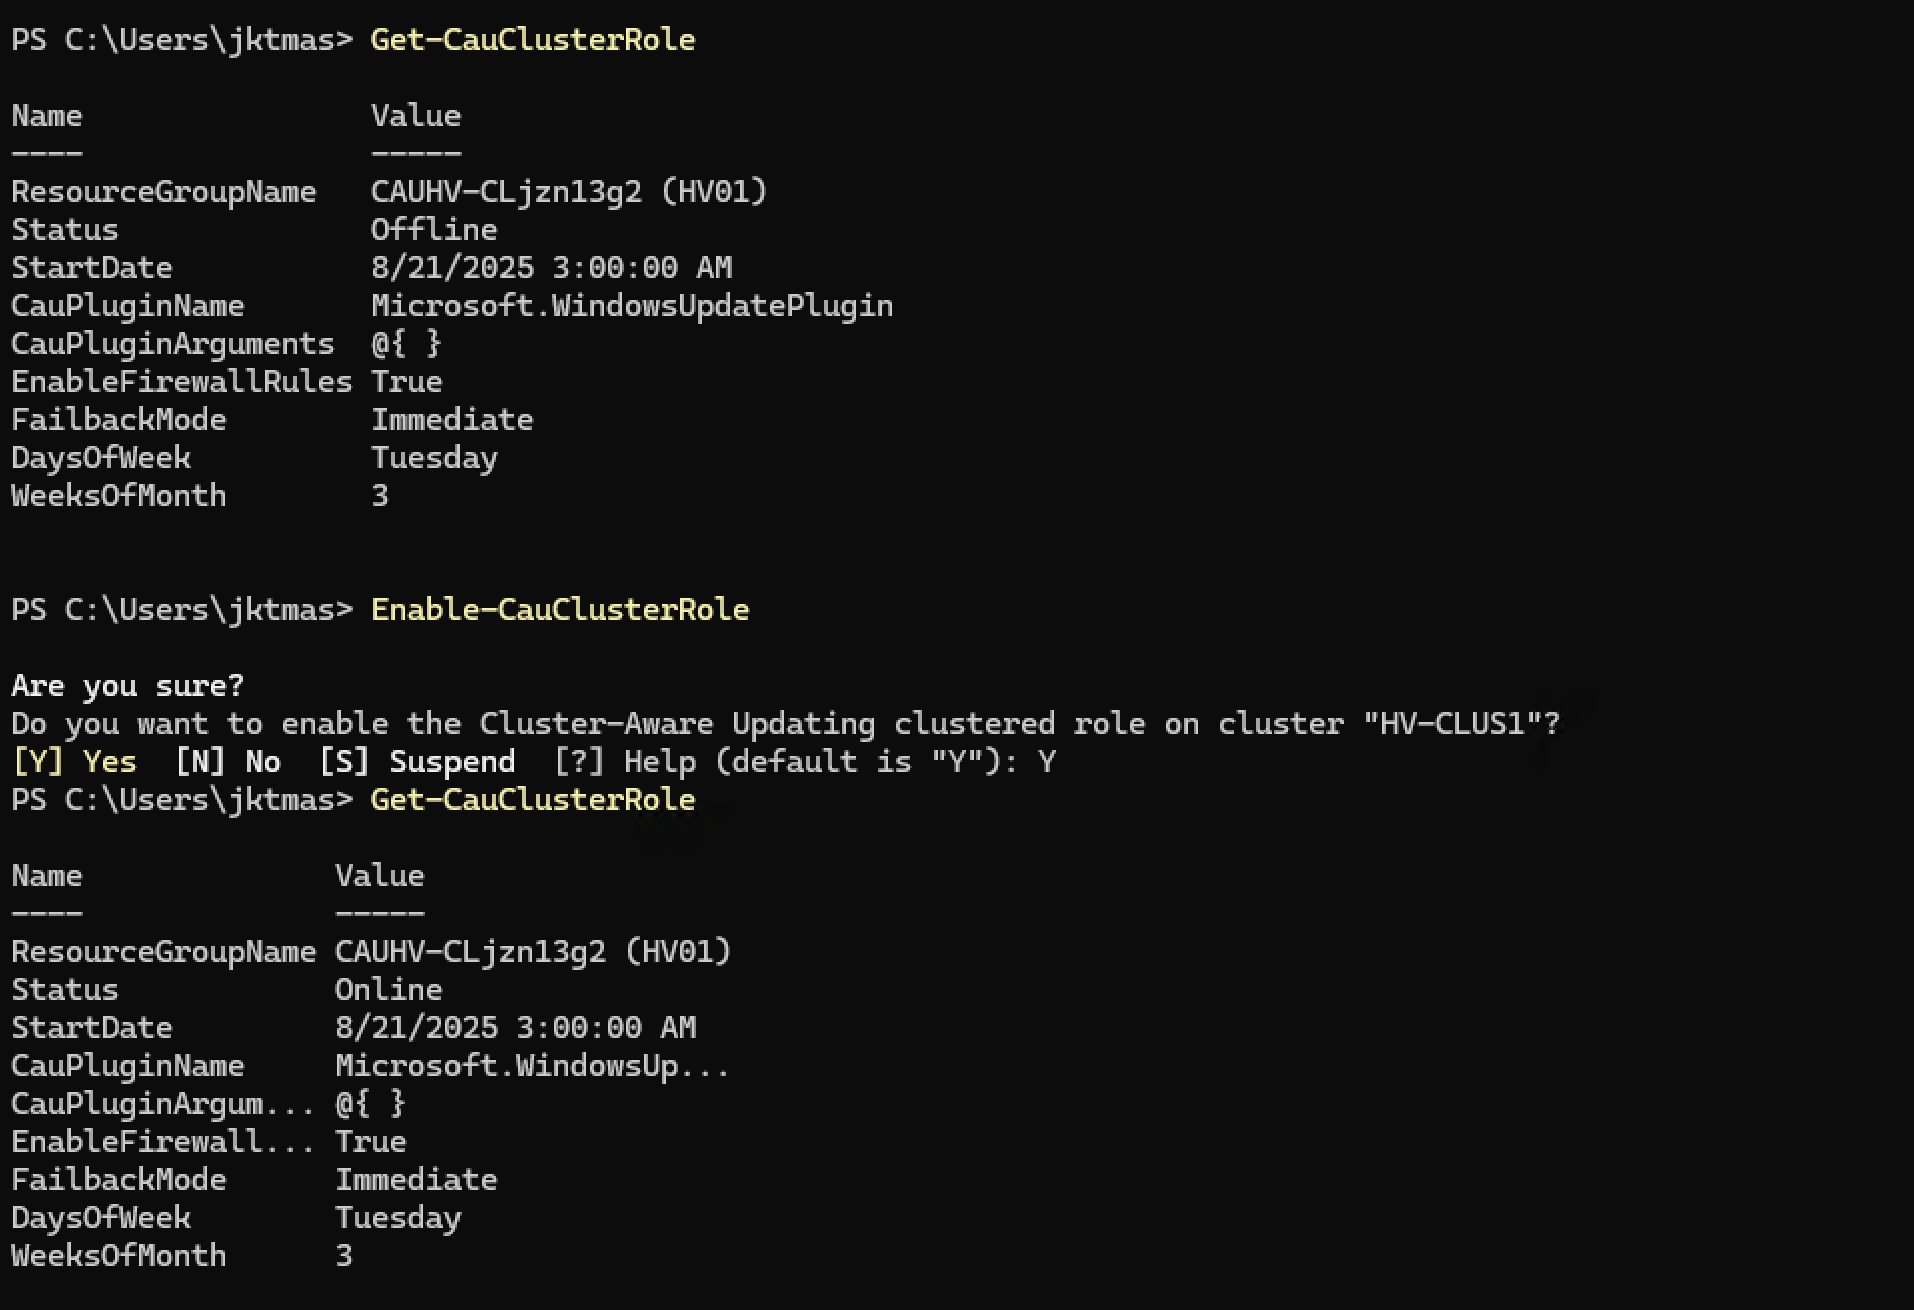
Set Cluster Witness
- Since this is a 2-node cluster, we definitely want a cluster witness. This is super easy, you just need to point it at a SMB share that both nodes can write to.
1Set-ClusterQuorum -Cluster HV-CLUS20 -FileShareWitness \\SERVER-1\HV-CLUS20 -Credential (Get-Credential) 2Get-ClusterQuorum -Cluster HV-CLUS20- You should then check that the cluster witness shows as “online” in FCM.
 Or better yet, Use a Cloud Witness!
1Set-ClusterQuorum -CloudWitness -AccountName <StorageAccountName> -AccessKey <StorageAccountAccessKey>
- You should then check that the cluster witness shows as “online” in FCM.
Set Up S2D
- Finally the fun part!
1Enable-ClusterStorageSpacesDirect -PoolFriendlyName ‘MICRO-S2D’ -Verbose - And check that the storage pool is online and healthy.
1Get-StoragePool
- Or if you want more details:
1Get-StoragePool -IsPrimordial $false | FL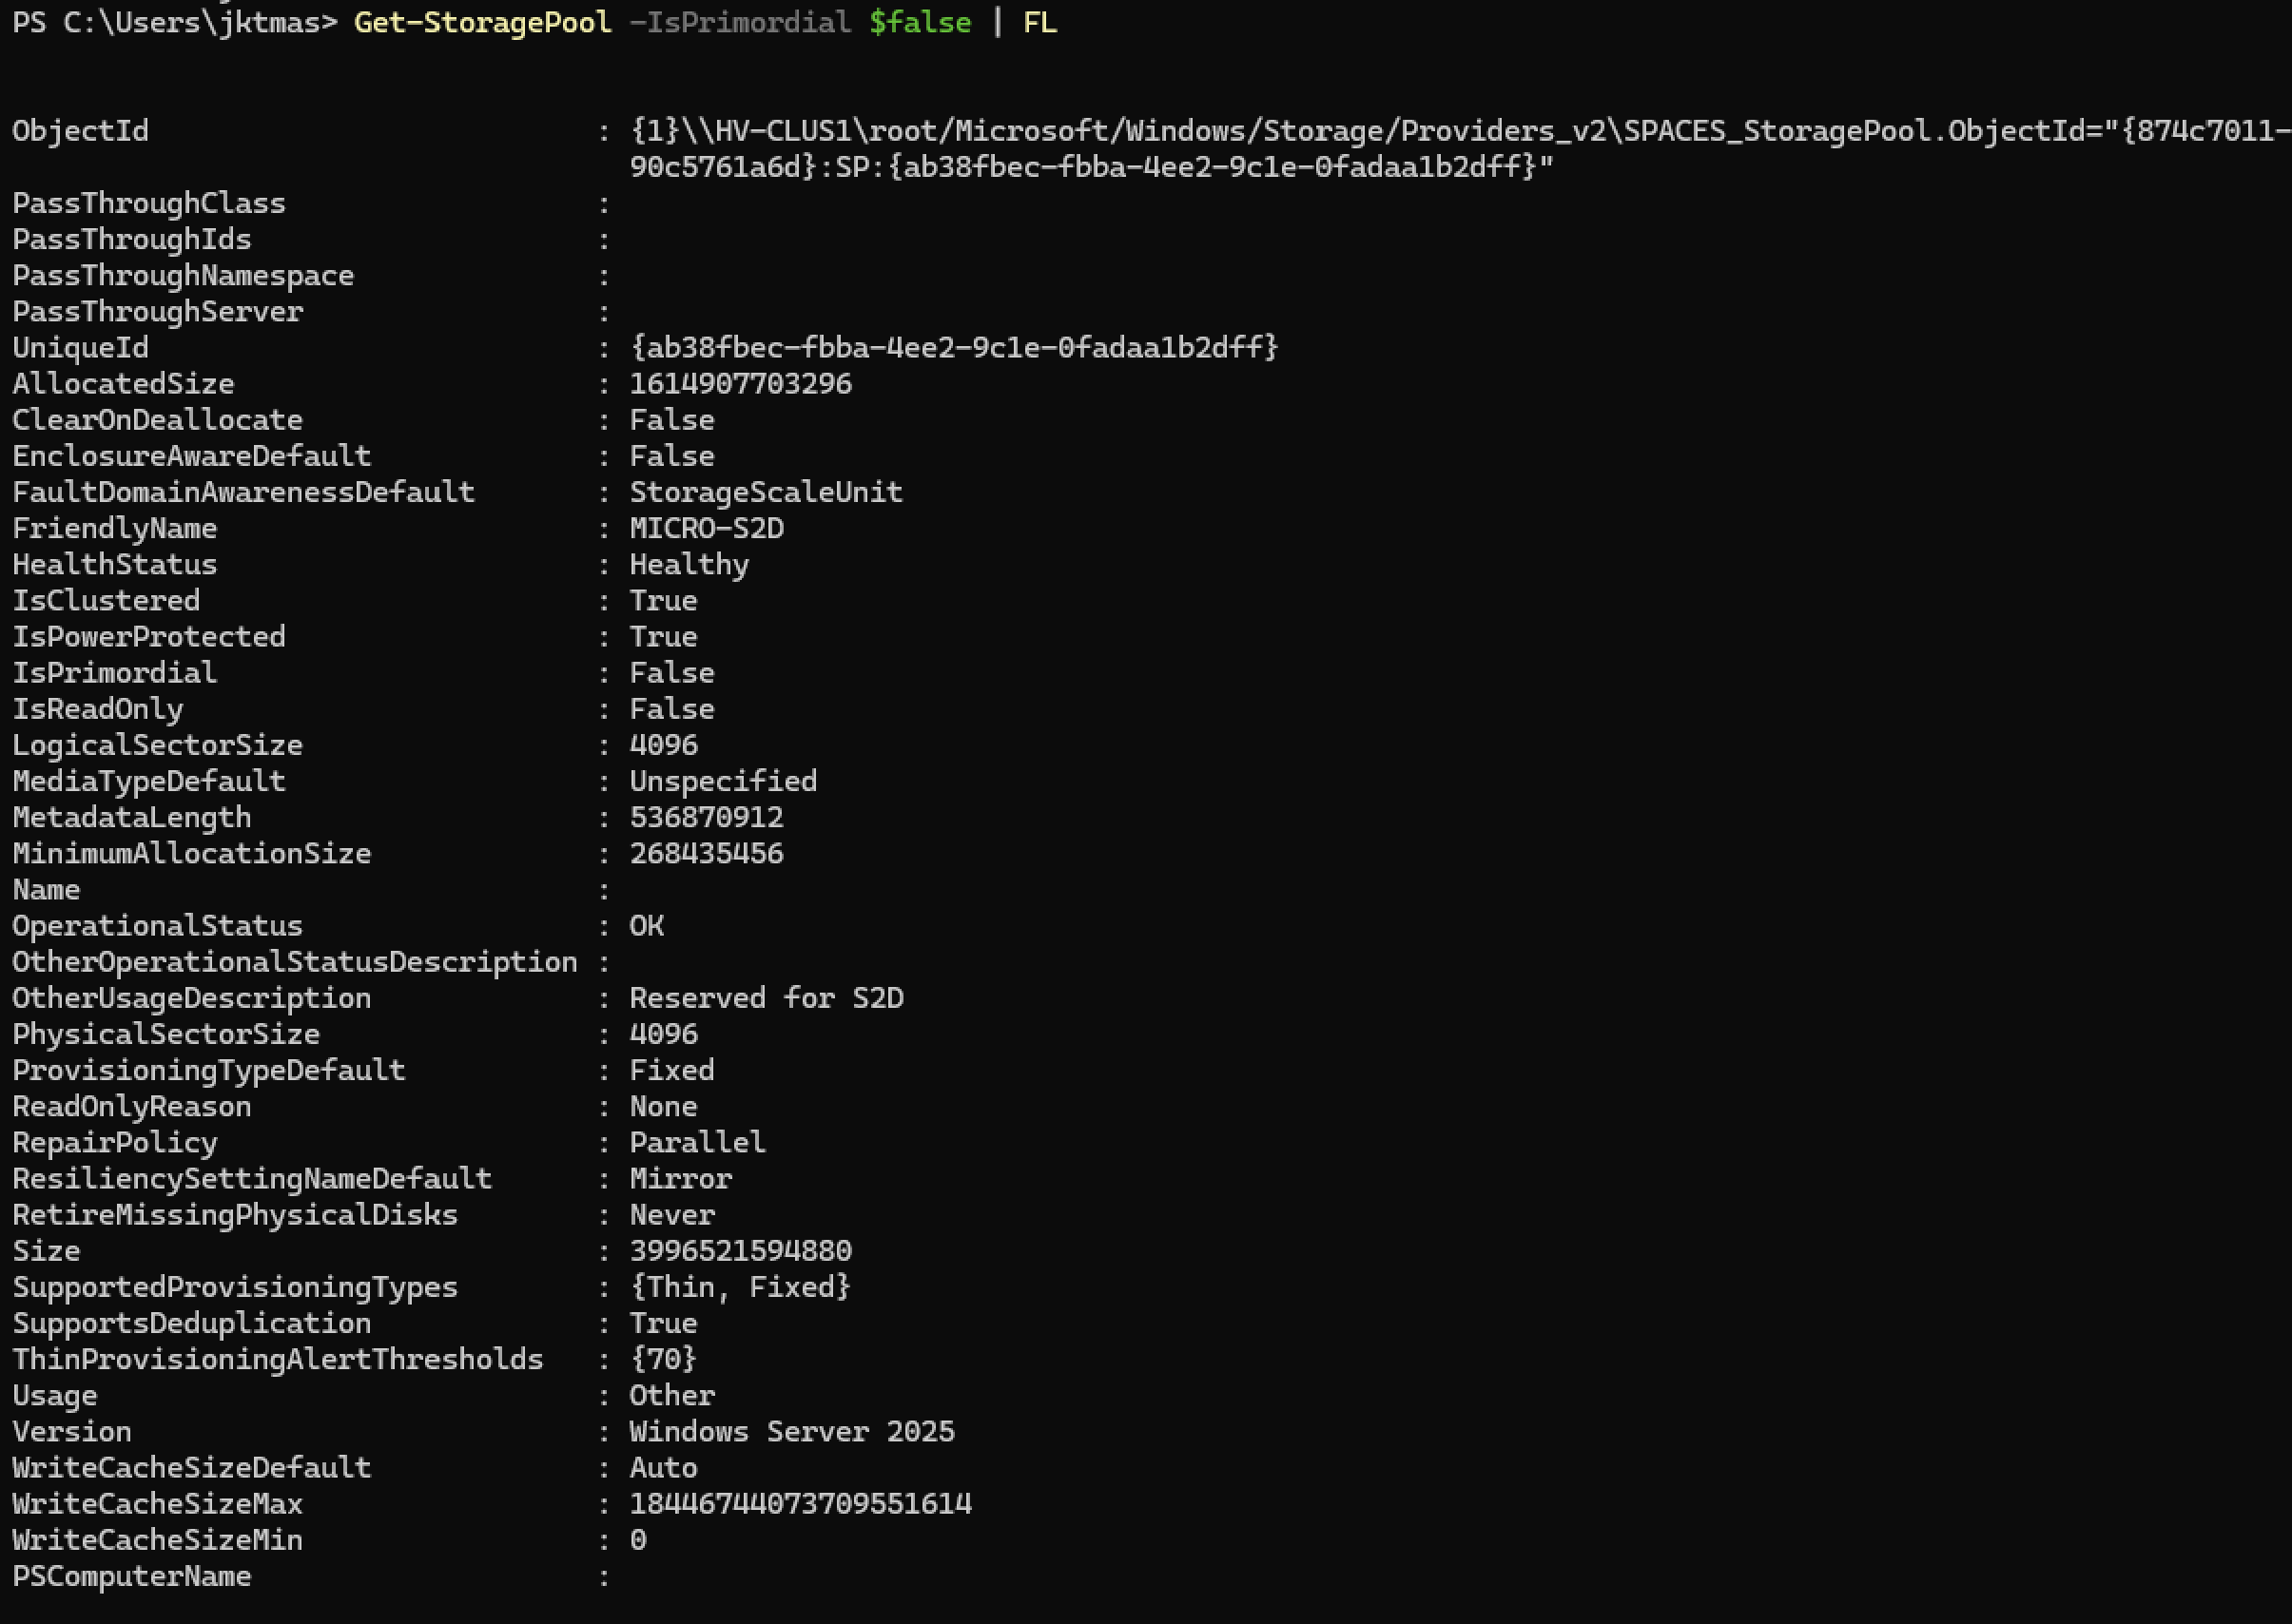
- Validate that the ClusterPerformanceHistory volume has been created. This can take up to ~15 minutes.
1Get-Volume
S2D Volume Creation
- First step here is really to understand how much space is available in your pool.
- I don’t yet have a S2D 101 post to point you to the MS Learn doc on S2D mirroring: https://learn.microsoft.com/en-us/windows-server/storage/storage-spaces/fault-tolerance#mirroring
- And a great S2D calculator made by Oberneder IT Solutions: https://s2d-calculator.com/
- Since I used 2x1TB SSD per node, I’m going to “lose” one drive worth of capacity per node to the recommended reserve, then I’m using 2-way mirroring across the two nodes, leaving me with just under 1TB usable, but I don’t want to run at 100% right out of the gate, so I’m going with couple 300GB CSV’s (Cluster Shared Volumes) to start.
1$StoragePool = Get-Storagepool -IsPrimordial $False
2New-Volume -StoragePool $StoragePool -FriendlyName CSV1 -FileSystem CSVFS_ReFS -Size 300GB -ResiliencySettingName "Mirror" -ProvisioningType "Fixed"
3New-Volume -StoragePool $StoragePool -FriendlyName CSV2 -FileSystem CSVFS_ReFS -Size 300GB -ResiliencySettingName "Mirror" -ProvisioningType "Fixed"
Hyper-V Tweaks
- Create (my) standard folder structure.
1New-Item -Path C:\ClusterStorage\CSV1\VMs -ItemType Directory 2New-Item -Path C:\ClusterStorage\CSV1\VHDs -ItemType Directory 3New-Item -Path C:\ClusterStorage\CSV1\ISOs -ItemType Directory - Set default locations for VM Creation.
1Get-ClusterNode | Foreach { Set-VMHost -ComputerName $_.Name -VirtualMachinePath 'C:\ClusterStorage\CSV1\VMs’ } 2Get-ClusterNode | Foreach { Set-VMHost -ComputerName $_.Name -VirtualHardDiskPath 'C:\ClusterStorage\CSV1\VHDs' } - Increase Failover Cluster load balancer aggressiveness (Yes, this is actually the valid powershell way to set this…)
1(Get-Cluster).AutoBalancerLevel = 2 - Set maximum parallel migrations. Don’t ask me why this isn’t covered with all the other things we’ve set.
1(get-Cluster).MaximumParallelMigrations = 3
Double checks, extra validation, and tidbits
-
I had plenty of weird things going on with WAC Network ATC on this deployment. I blame it on using the latest vNext version of Windows Server, latest preview version of WAC, and some other unnamed new features. This is basically a list of good things to double check.
-
Double check that Network ATC extension works in WAC. Mine did not, and I had to add a different extension feed to get a newer version of Network ATC than what was in the default feed.
- WAC > Settings > Extensions > Feeds > Add “https://aka.ms/sme-extension-feed"
- Install the newest Network ATC Extension.
-
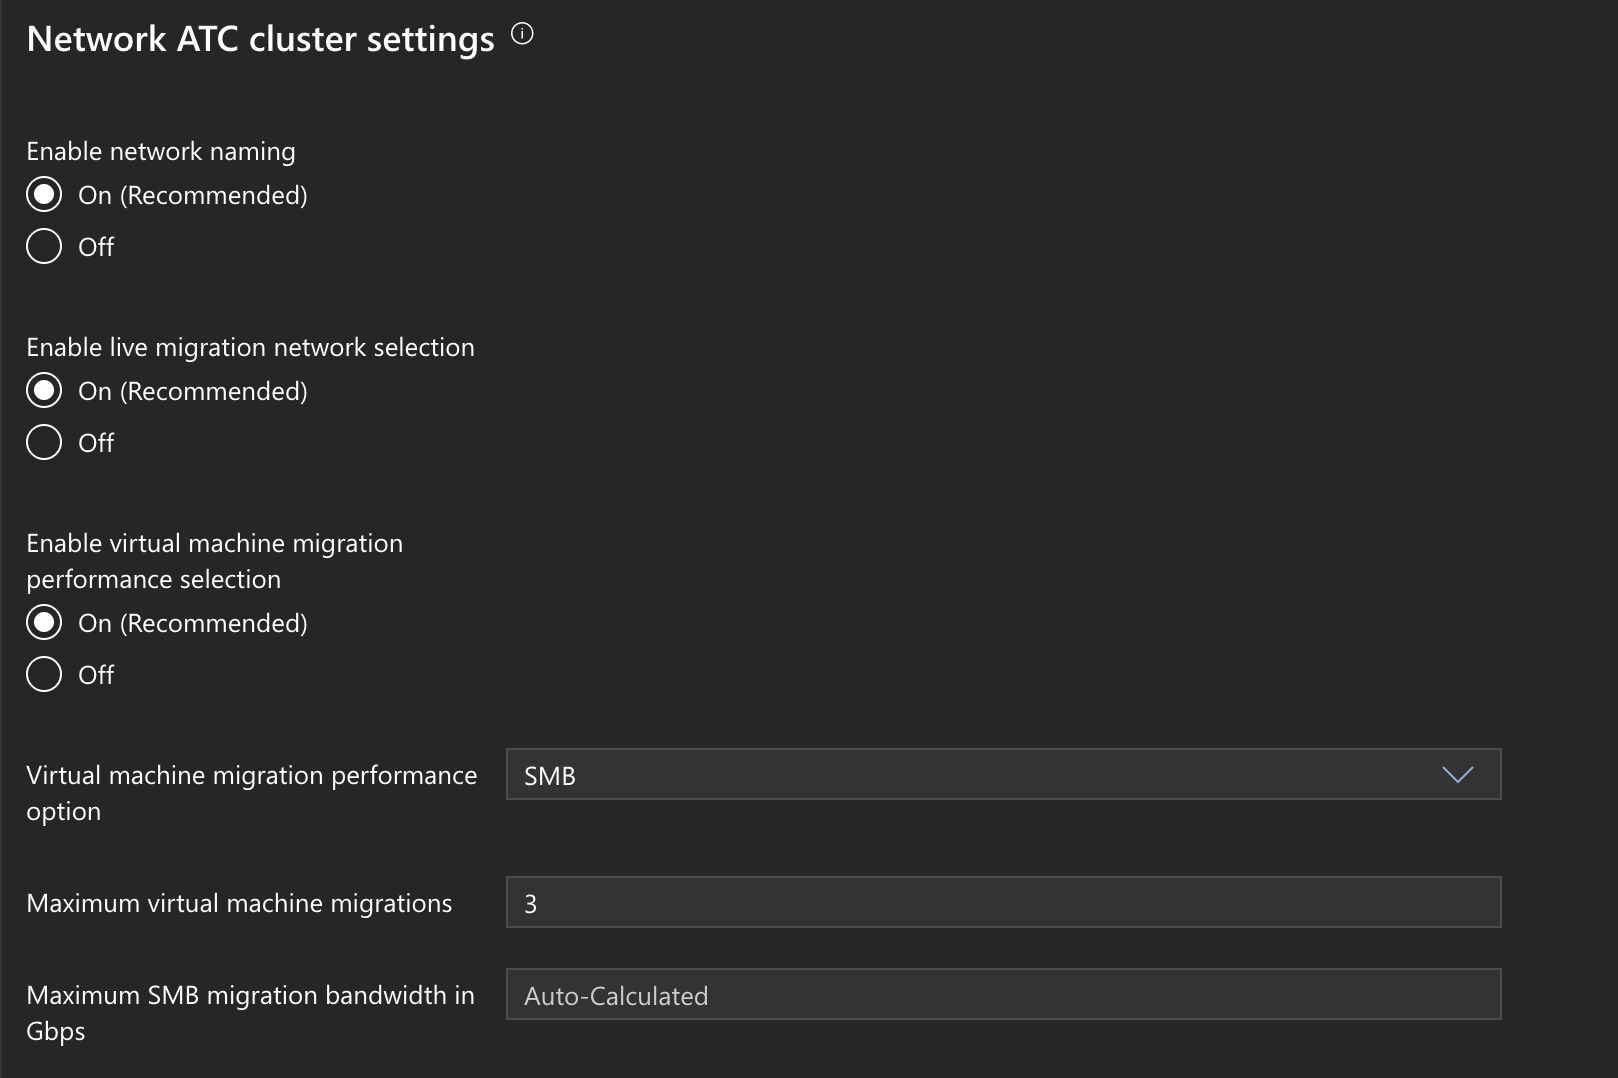
Double check Network ATC Global Overrides. I had some funky stuff with my Network ATC Powershell module, so I double checked everything looked good in WAC.
- WAC > Cluster > Network ATC CLuster Settings
-
Set CPU Scheduler to the newer Core Scheduler.
- Powershell:
1bcedit /set hypervisorschedulertype Core 2{ - WAC > Cluster > Settings > General
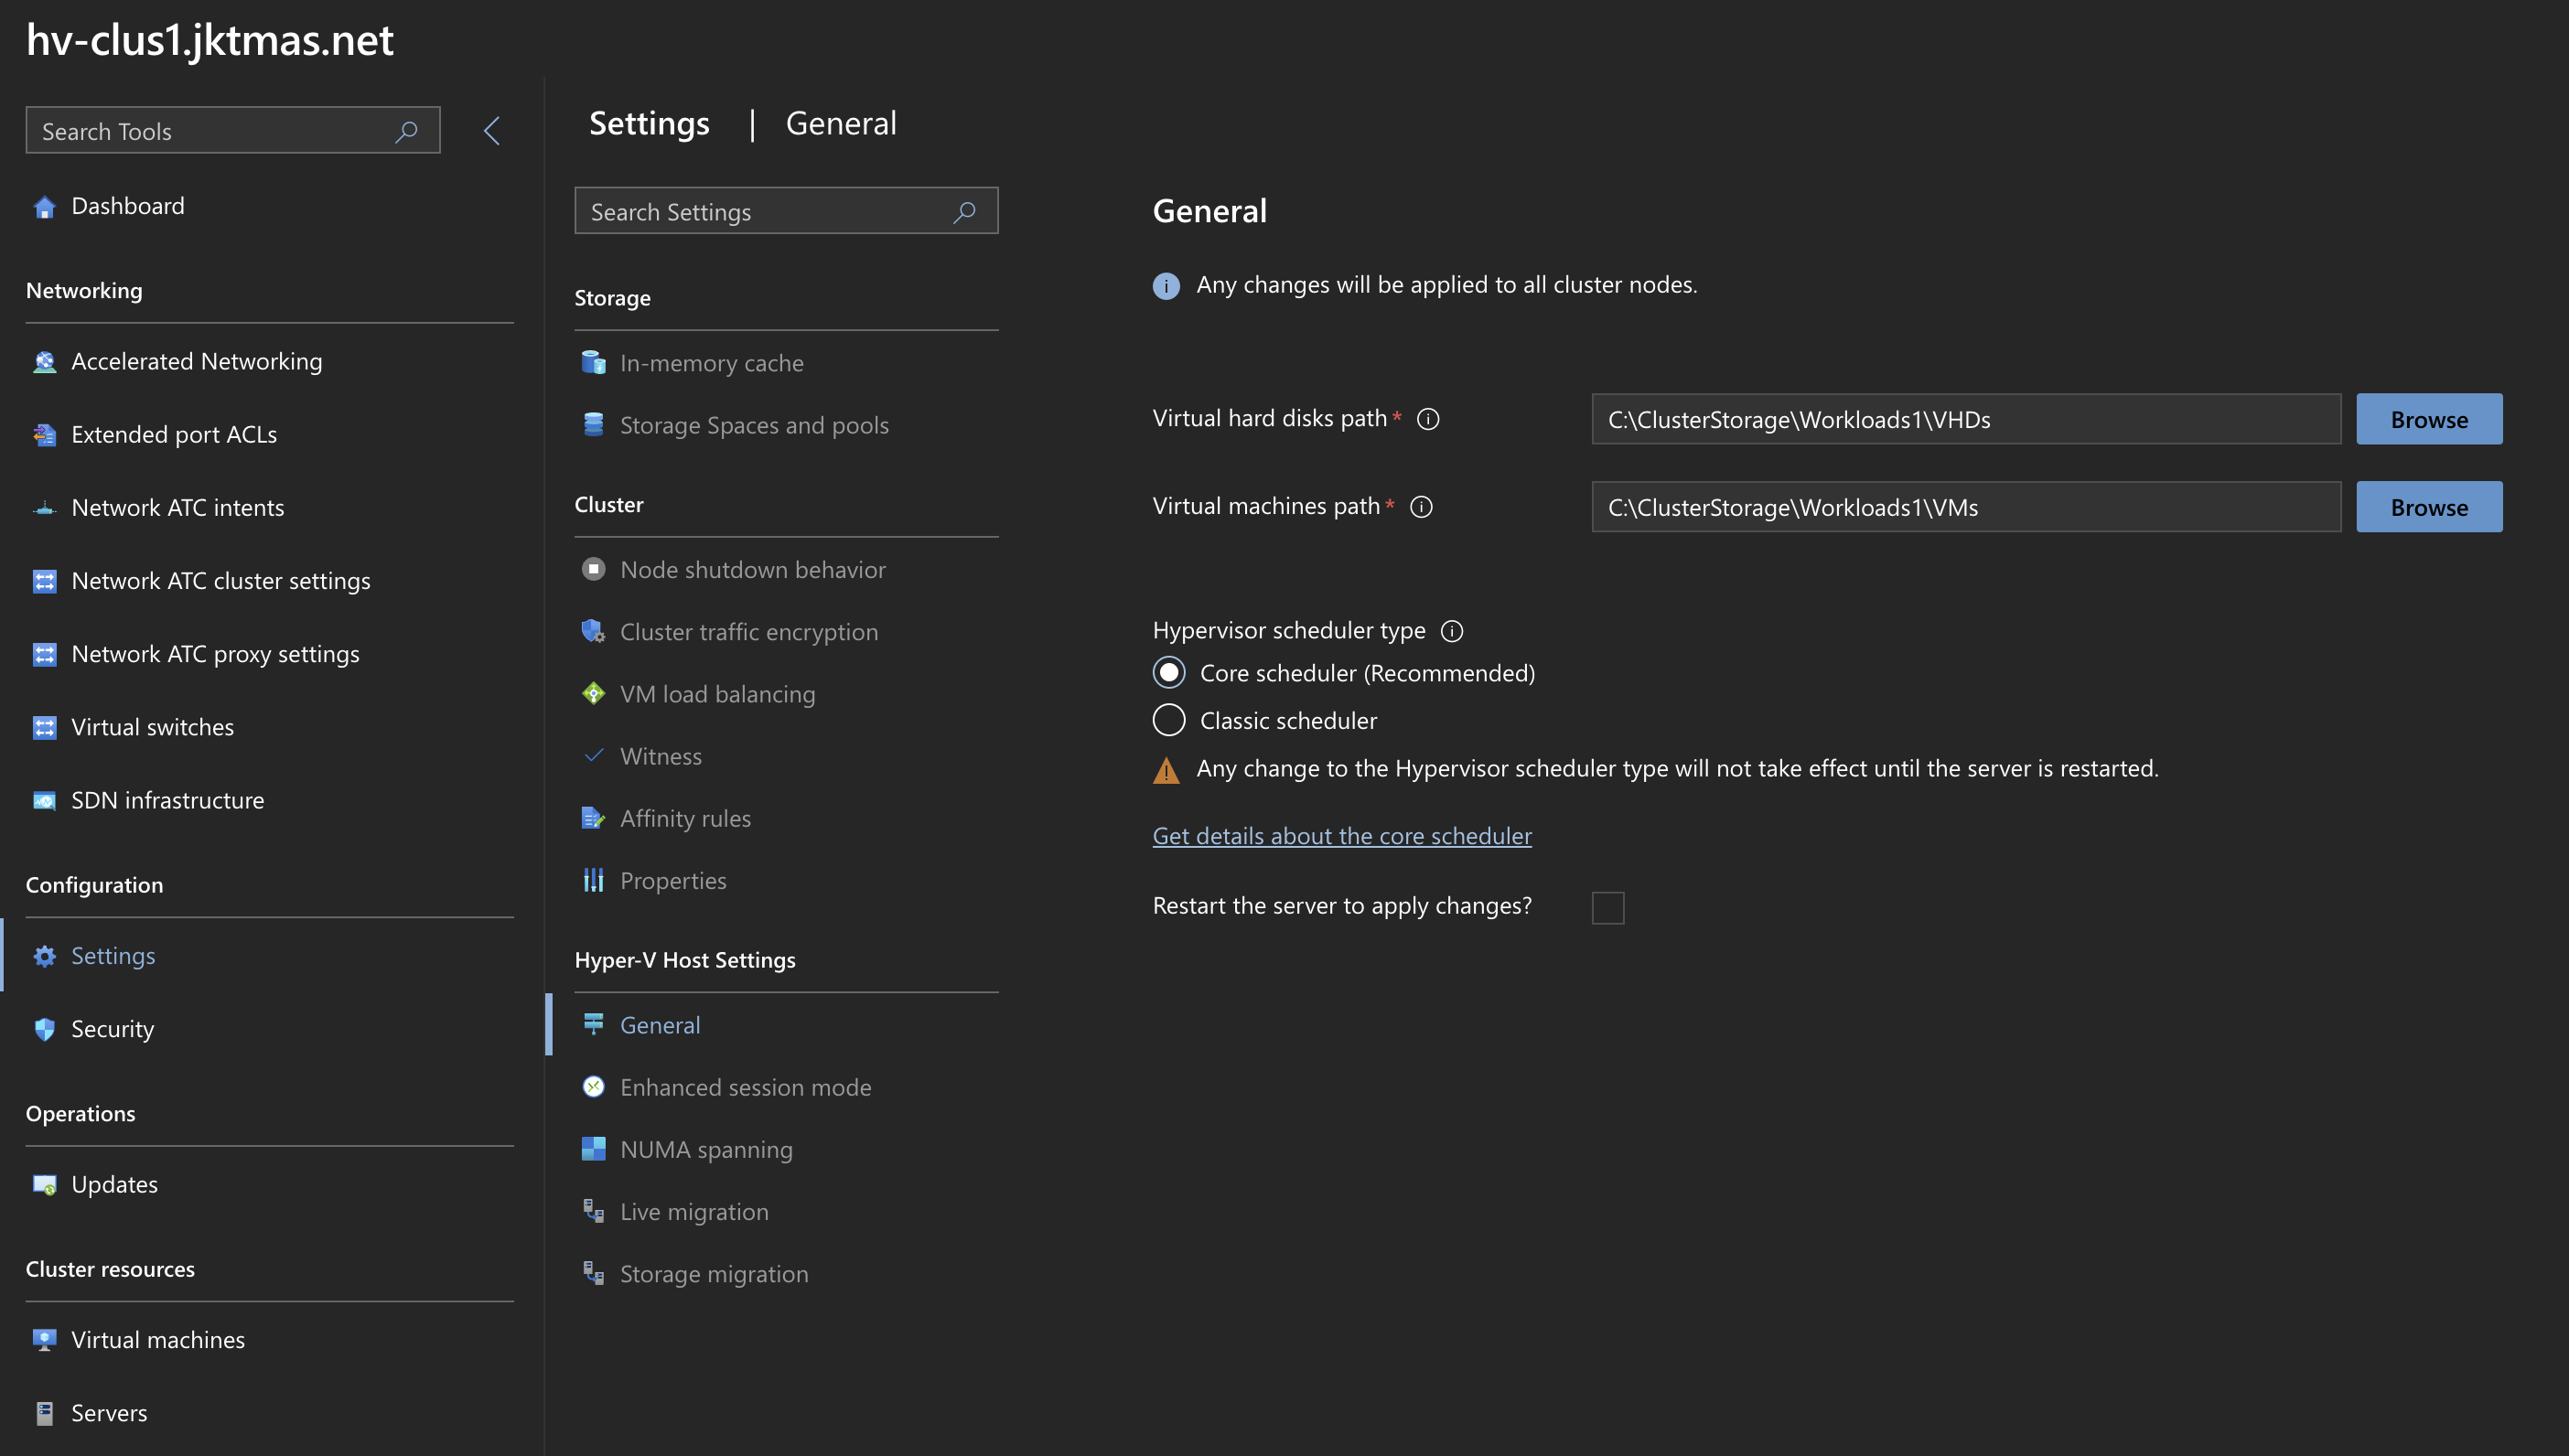
- Powershell:
-
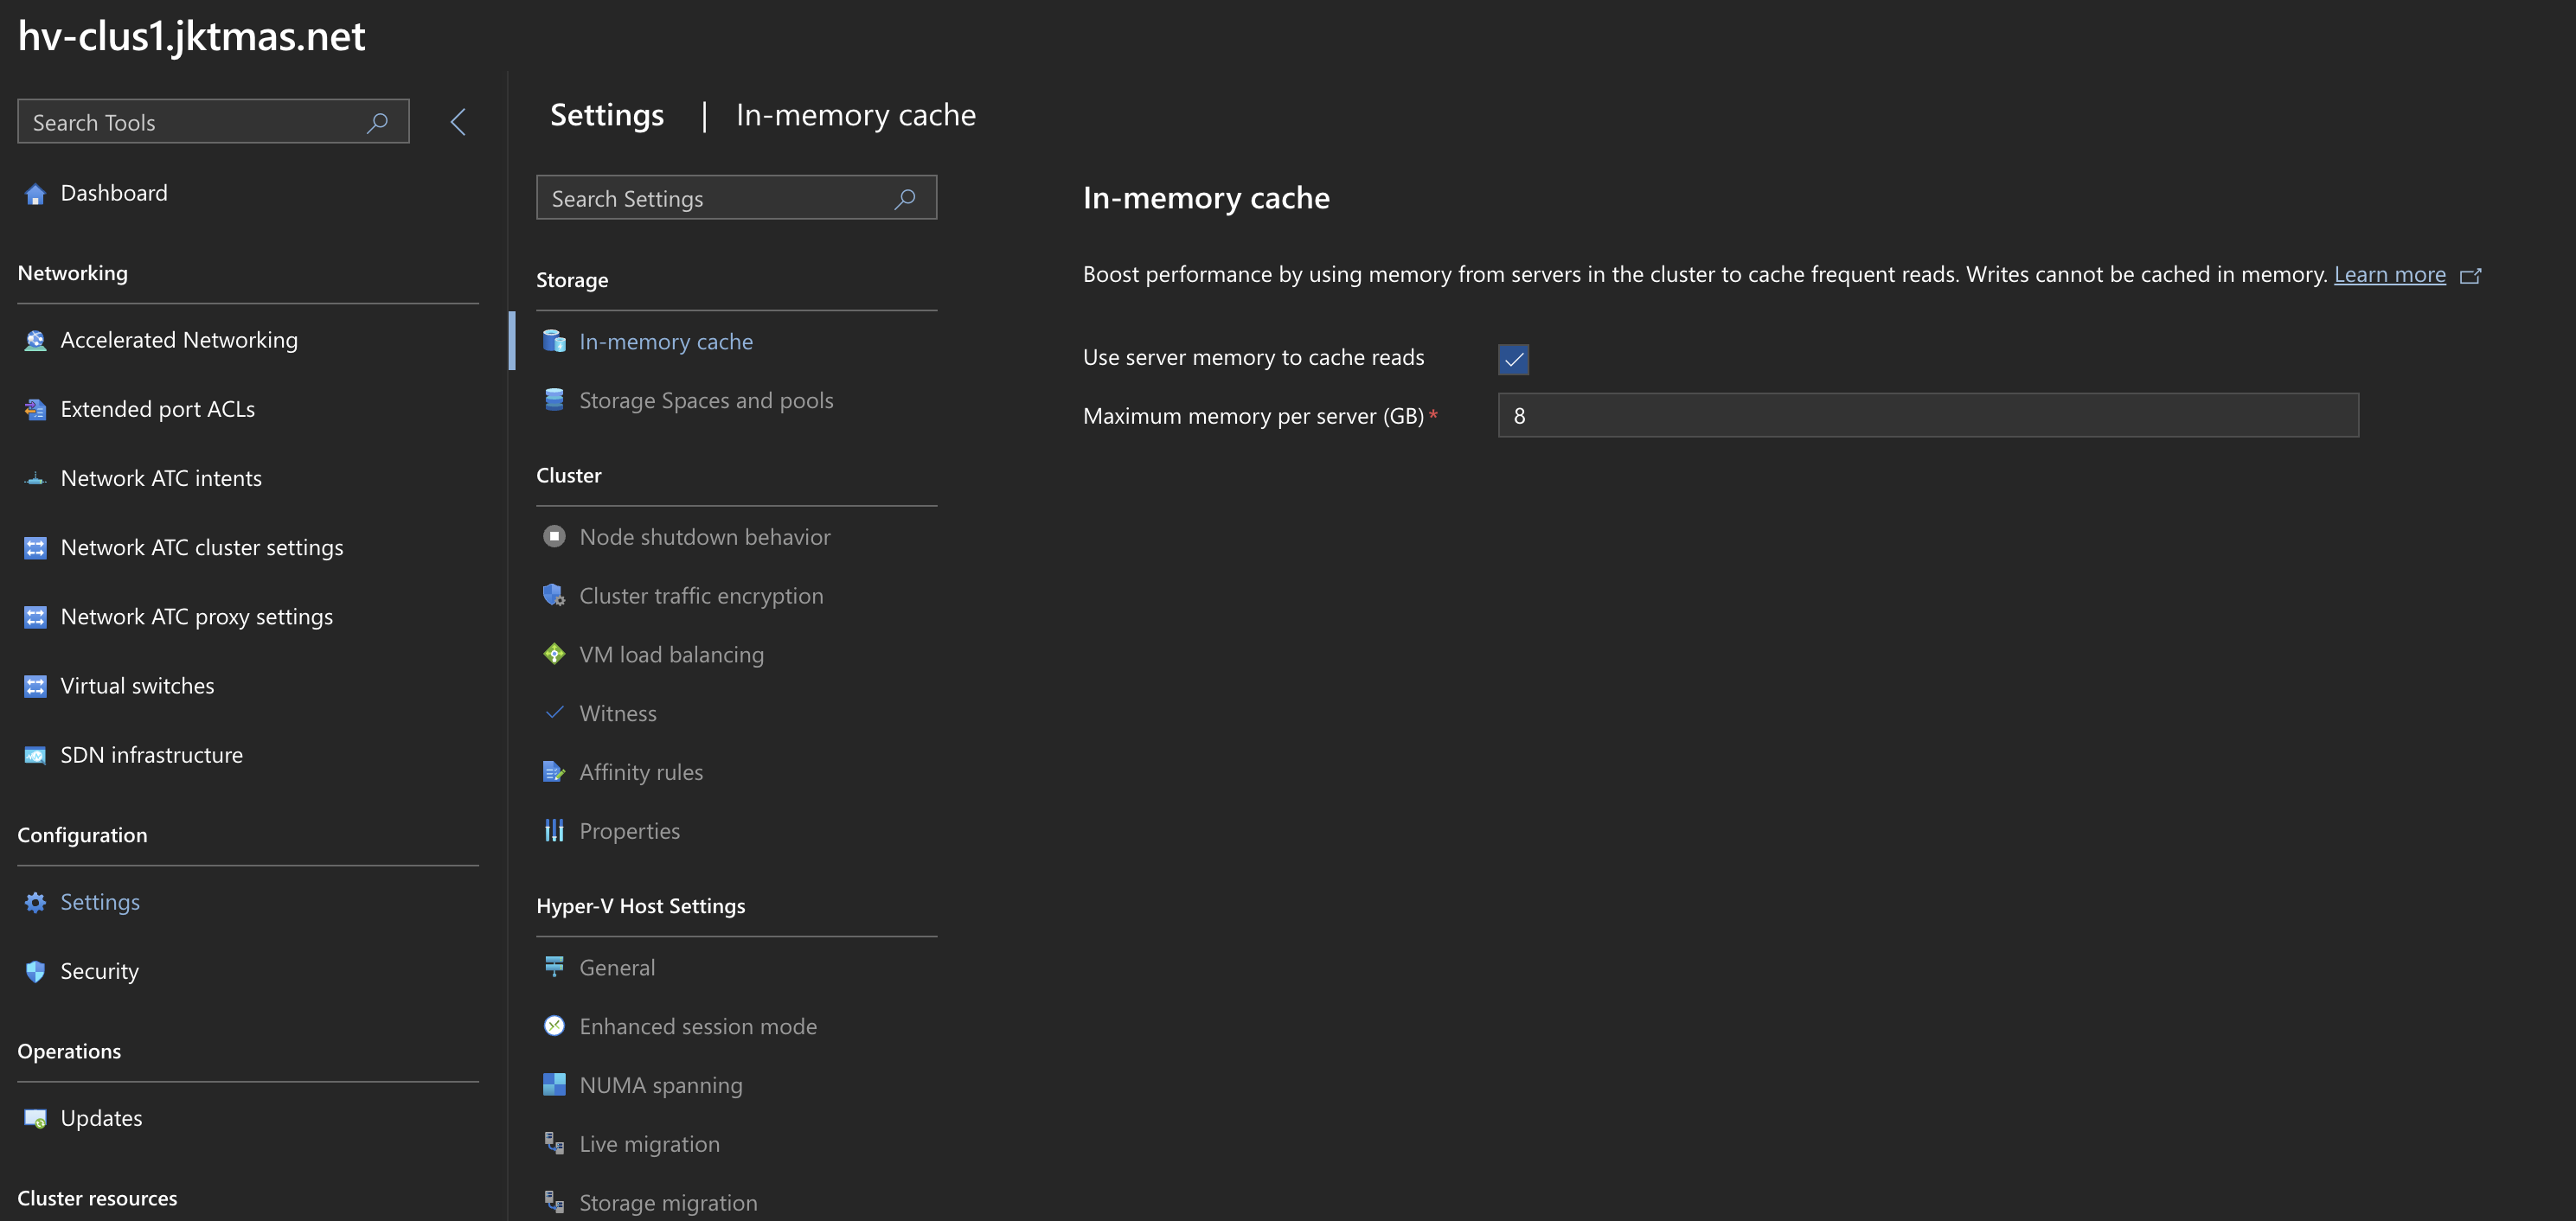
Enable In-Memory read cache. I have enough RAM, so I’m happy to give some up to in-memory read cache. This is basically what every linux ZFS system is doing with ARC.
- WAC > Cluster > Settings > In-memory Cache
-
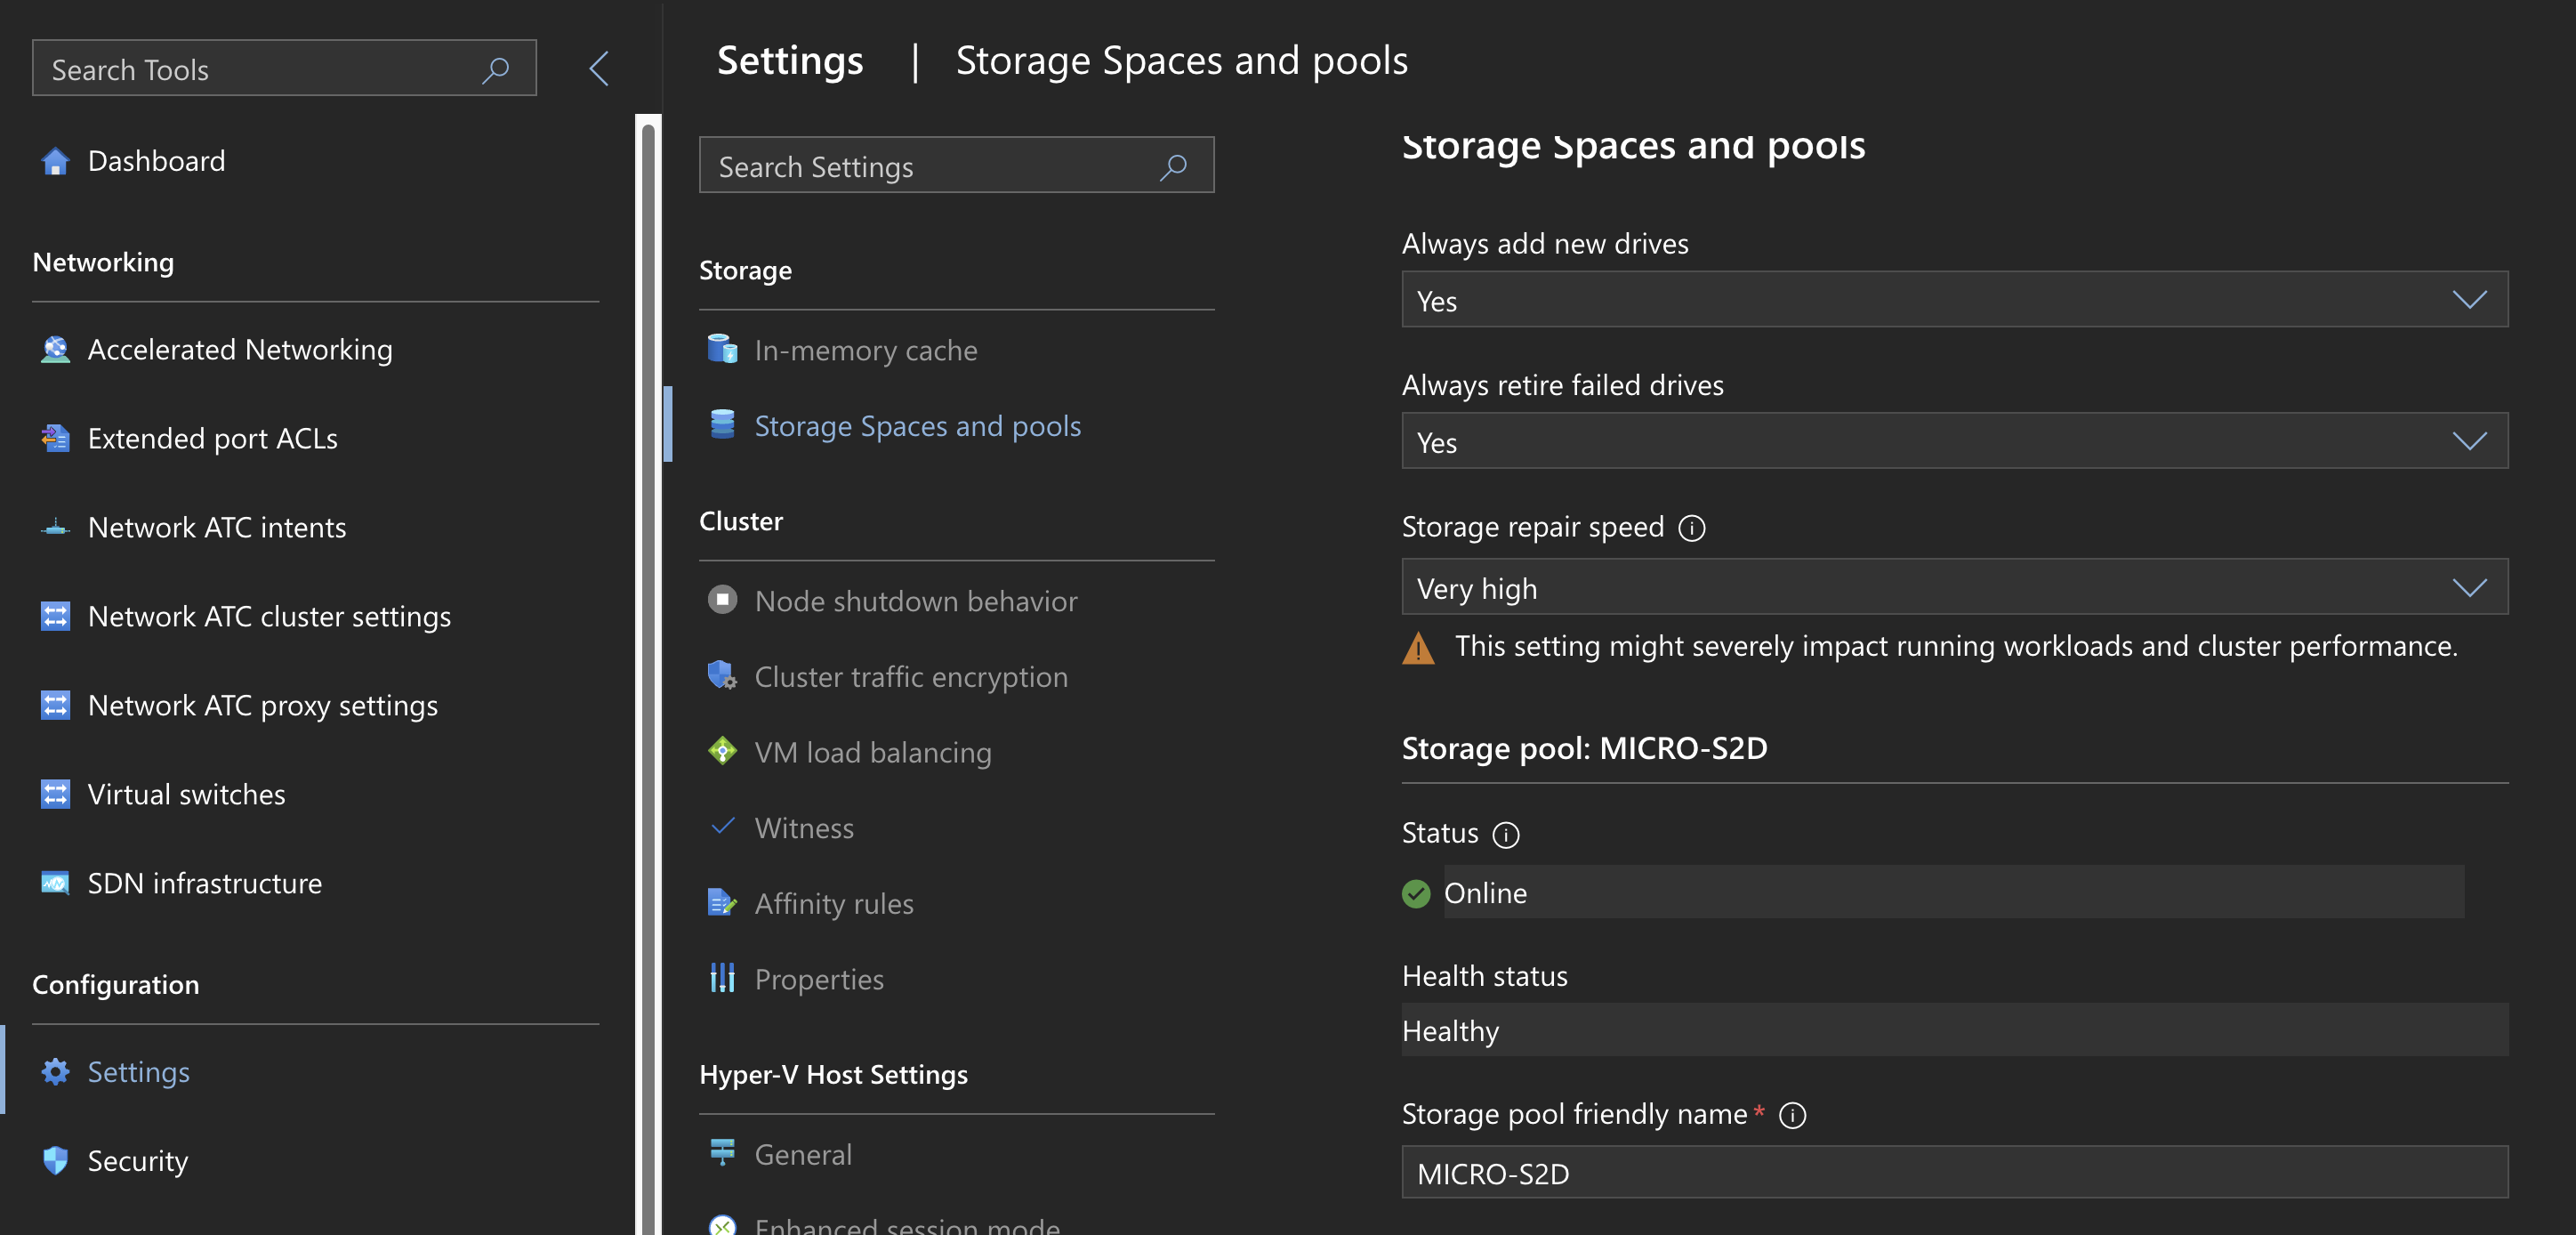
Set Storage Spaces Repair Speed
- WAC > Cluster > Settings > Storage Spaces and Pools
-
Check SMB Multichannel
1Get-SmbMultichannelConnection -SmbInstance SBL -
Getting rid of a removed adapters from showing up as partitioned in FCM
- The docs claim that you can use Add-ClusterExcludedAdapter commands to fix this, but I have never been able to get them to work. Here’s the actual fix:
- Open Regedit, navigate to “Computer\HKEY_LOCAL_MACHINE\Cluster\NetworkInterfaces" and delete all references to the removed adapter. Having good friendly names will help here.
-
Affinity rules vs Preferred Owners
- Affinity rules can be configured in WAC or Powershell, and allow you to try and keep two or more VMs together or apart. For most production VMs, this is what you probably want to use. You can also enable “soft anti-affinity” so if you don’t have enough nodes in the cluster to keep them apart, it will keep them running. Perfect use case for this is having two domain controllers on a 3-node cluster.
- Preferred Owner allows you to specify which node in the cluster you’d like the role (VM) to run on. This can have some interesting use cases. In my case, I want to keep DC1 on HV01, and DC2 on HV02 so I chose to use preferred owners. Preferred owner does however have some… unintuitive logic to it. If you think you want to use this, you should read the doc thoroughly. https://learn.microsoft.com/en-us/troubleshoot/windows-server/high-availability/groups-fail-logic-three-more-cluster-node-members
-
Ubuntu VM optimizations
1sudo apt update
2sudo apt install linux-azure linux-image-azure linux-headers-azure linux-tools-common linux-cloud-tools-common linux-tools-azure linux-cloud-tools-azure
3sudo apt full-upgrade
4sudo apt install openssh-server
5sudo reboot